

This post contains affiliate links, please click here for more info. Thank you for supporting Grace and Yarn!
If you've been here awhile you may remember this sweet llama as part of a CAL (crochet-a-long) we hosted back in 2018. They were such a blast to make and recently I decided to go back through and revise the pattern for you!

Cheeks –
With pink make 2
Round 1: Create a magic circle with 6 HDC, pull tight to close and secure with a slip st to the first HDC
Fasten off leaving a long tail for sewing.
Legs, Body, Head -
Legs - Make 2 – Starting with accent color
Round 1: Create a magic circle with 6 SC
Round 2: SC INC in each st (12)
Round 3: *SC in the first st, SC INC in the next*, *rep around (18)
Rounds 4-8: SC around (18)
Change to body color
Rounds 9-22: SC around (18)
Fasten off (when you finish the 2nd leg do not fasten off, proceed to round 23)
*Round 23 joins the legs together and starts the body
Round 23: Chain 3 and attach to the first leg with a SC (make sure your color changes are facing the same direction), SC in the remaining sts around the leg, when you reach the chain make a SC across each of the 3 chains, SC in the remaining sts of the next leg and SC across each of the 3 chains (you will have SC on both sides of the 3 chains now) (42 SC) This completes your join and is where your next round will start to form the body.

Rounds 24-40: SC around (42)
Round 41: *SC in the first 5 sts, INV DEC*, *rep around (36)
Round 42: *SC in the first 4 sts, INV DEC*, *rep around (30)
Round 43: SC around (30)
Round 44: *SC in the first 3 sts, INV DEC*, *rep around (24)
Round 45: *SC in the first 2 sts, INV DEC*, *rep around (18)
Rounds 46-51: SC around (18)
Round 52: *SC in the first 2 sts, SC INC in the next*, *rep around (24)
Round 53: *SC in the first 3 sts, SC INC in the next*, *rep around (30)
Round 54: *SC in the first 4 sts, SC INC in the next*, *rep around (36)
Round 55: *SC in the first 5 sts, SC INC in the next*, *rep around (42)
Round 56: *SC in the first 6 sts, SC INC in the next*, *rep around (48)
Round 57: *SC in the first 7 sts, SC INC in the next*, *rep around (54)
Rounds 58-66: SC around (54)
NOTE - Here is where we will attach the facial features. Place the safety eyes 6 sts apart between rounds 63 and 64. Add eyebrows/eyelashes to your liking before securing the backs of your safety eyes.
Nose – Sew your nose piece centered between the eyes adding stuffing as you go.
Cheeks – Sew cheeks just outside of your nose piece.

Round 67: *SC in the first 7 sts, INV DEC*, *rep around (48)
Round 68: *SC in the first 6 sts, INV DEC*, *rep around (42)
Round 69: *SC in the first 5 sts, INV DEC*, *rep around (36)
Round 70: *SC in the first 4 sts, INV DEC*, *rep around (30)
*Continue to stuff the head and neck firmly to avoid a wobbly head*
Round 71: *SC in the first 3 sts, INV DEC*, *rep around (24)
Round 72: *SC in the first 2 sts, INV DEC*, *rep around (18)
Round 73: *SC in the first st, INV DEC*, *rep around (12)
Round 74: INV DEC around (6)
Fasten off and sew remaining hole closed, weave in your end.
Ears-
With accent color make 2
Round 1: Create a magic circle with 8 SC
Rounds 2-3: SC around (8 SC)
Round 4: *SC in the first st, SC INC in the next*, *rep around (12 SC)
Round 5: SC around (12 SC)
Round 6: *SC in the first 2 sts, SC INC in the next*, *rep around (16 SC)
Rounds 7-12: SC around (16 SC)
Fold ear in half and SC across the top as pictured, then fasten off leaving a long tail for sewing.

Arms- Make 2
*Lightly stuff the bottom half of the arms*
With accent color
Round 1: Create a magic circle with 6 SC
Round 2: SC INC in each stitch around (12)
Rounds 3-6: SC around (12)
Change to body color
Rounds 7-22: SC around (12)
At the end of round 22 pinch the arm flat and make 6 SC across the top to close, fasten off and leave a long tail to sew onto the body.

Tail-
With accent color
Round 1: Create a magic circle with 8 SC
Round 2: SC INC in each st around (16)
Rounds 3-7: SC around (16)
Fasten off leaving a long tail for sewing.
Scarf-
With color of choice and 5mm hook, chain 78
Row 1: HDC in the 2nd chain from hook and in each chain across, chain 1 and turn (77)
Rows 2-3: HDC across (77)
Cut 4 strands of yarn about 6 inches long, slip st each strand into the ends of the scarf to create a fringe (I left my starting and ending yarn there as fringe, no need to weave them in). Cut the strands to even length.

Assembly -


Your llama is complete! I hope you have enjoyed making this pattern. Let me know if you have any questions with this pattern or any of my other patterns, I would be happy to help.
Thanks so much for stopping by!
- Stephanie
What's changed? Step by step pictures have been updated to be more clear and helpful in your making process. I have also adapted the pattern to include the head into one piece with the legs and body. No more sewing it on separately at the end.
To keep the legs, body and head as one piece I shortened the neck slightly as well as taking away a tiny bit of the width. This will help keep the neck strong and virtually wobble-free. You'll also want to make sure your stitches are on the tight side and that your neck and shoulders are firmly stuffed.
Everything else in the pattern has remained the same. I forgot how much fun this pattern was to work up and am totally planning my next one with some super soft velvet yarn!
For this lady I used WeCrochet's Comfy Worsted in the shades White, Parchment, Flamingo and Peony. It's a worsted weight made of 75% Pima Cotton and 25% Acrylic yarn. I used it last Winter for our Nativity CAL and loved these shades for our llama!
If you're new to amigurumi this is fun project to start on. You can also find more tips to walk you through it below!
If you're new to amigurumi this is fun project to start on. You can also find more tips to walk you through it below!
Tips for Amigurumi - Joining Legs in Amigurumi - Stuffing Amigurumi
If you'd like to be notified when new patterns are released you can sign-up for my newsletter here! I'll keep you updated on new patterns, giveaways and tutorials as they're posted!
Pattern
Grab an ad-free printable version in my Etsy or Ravelry shop!
PIN to your favorite crochet board here!
You may make and sell items from this pattern but please do not sell, share or reproduce the actual pattern. If you sell finished items online (Etsy, etc) please provide a link to the pattern and credit to me as the designer, thank you. I hope you enjoy this pattern!
Materials -

Abbreviations - US terminology
SC- Single crochet
SC INC- Single crochet increase
INV DEC- Invisible decrease
HDC- Half double crochet
St(s) – Stitch(es)
Rep - Repeat
Notes –
· Llama measures about 15 inches tall from top of ear to feet.
· Slowly stuff as you go, you want it to be firm but not stretched. You will be working in a continuous round, I like using a stitch marker at the beginning of each round.
· The legs, body and head are made as one piece.
· We will use size 3.5mm hook for each part with the exception of the scarf, where we will use the 5mm hook.
Nose -
With accent color
Round 1: Create a magic circle with 6 SC
Round 2: SC INC in each st (12)
Round 3: *SC in the first st, SC INC in the next*, *rep around (18)
Round 4: *SC in the first 2 sts, SC INC in the next*, *rep around (24)
Rounds 5-7: SC around (24)
Fasten off leaving a long tail for sewing. With black crochet or embroidery thread make a ‘V’ for the nose and a straight line measuring a few sts down. Feel free to add a smile for extra detail.
If you'd like to be notified when new patterns are released you can sign-up for my newsletter here! I'll keep you updated on new patterns, giveaways and tutorials as they're posted!
Pattern
Grab an ad-free printable version in my Etsy or Ravelry shop!
PIN to your favorite crochet board here!
You may make and sell items from this pattern but please do not sell, share or reproduce the actual pattern. If you sell finished items online (Etsy, etc) please provide a link to the pattern and credit to me as the designer, thank you. I hope you enjoy this pattern!
Materials -
- Size 4 worsted weight yarn
- 150 yards of main body color
- Small amount of
- Accent color (nose, ears, tail and limbs)
- Color of choice for scarf
- Crochet thread/embroidery floss for facial features
- 3.5 mm and 5mm crochet hook (these are the hooks I use and love!)
- 12 mm safety eyes
- Scissors
- Tapestry needle (bent tips work wonders for amigurumi)
- Stuffing
- Stitch markers

Abbreviations - US terminology
SC- Single crochet
SC INC- Single crochet increase
INV DEC- Invisible decrease
HDC- Half double crochet
St(s) – Stitch(es)
Rep - Repeat
Notes –
· Llama measures about 15 inches tall from top of ear to feet.
· Slowly stuff as you go, you want it to be firm but not stretched. You will be working in a continuous round, I like using a stitch marker at the beginning of each round.
· The legs, body and head are made as one piece.
· We will use size 3.5mm hook for each part with the exception of the scarf, where we will use the 5mm hook.
Nose -
With accent color
Round 1: Create a magic circle with 6 SC
Round 2: SC INC in each st (12)
Round 3: *SC in the first st, SC INC in the next*, *rep around (18)
Round 4: *SC in the first 2 sts, SC INC in the next*, *rep around (24)
Rounds 5-7: SC around (24)
Fasten off leaving a long tail for sewing. With black crochet or embroidery thread make a ‘V’ for the nose and a straight line measuring a few sts down. Feel free to add a smile for extra detail.

Cheeks –
With pink make 2
Round 1: Create a magic circle with 6 HDC, pull tight to close and secure with a slip st to the first HDC
Fasten off leaving a long tail for sewing.
Legs, Body, Head -
Legs - Make 2 – Starting with accent color
Round 1: Create a magic circle with 6 SC
Round 2: SC INC in each st (12)
Round 3: *SC in the first st, SC INC in the next*, *rep around (18)
Rounds 4-8: SC around (18)
Change to body color
Rounds 9-22: SC around (18)
Fasten off (when you finish the 2nd leg do not fasten off, proceed to round 23)
*Round 23 joins the legs together and starts the body
Round 23: Chain 3 and attach to the first leg with a SC (make sure your color changes are facing the same direction), SC in the remaining sts around the leg, when you reach the chain make a SC across each of the 3 chains, SC in the remaining sts of the next leg and SC across each of the 3 chains (you will have SC on both sides of the 3 chains now) (42 SC) This completes your join and is where your next round will start to form the body.

Rounds 24-40: SC around (42)
Round 41: *SC in the first 5 sts, INV DEC*, *rep around (36)
Round 42: *SC in the first 4 sts, INV DEC*, *rep around (30)
Round 43: SC around (30)
Round 44: *SC in the first 3 sts, INV DEC*, *rep around (24)
Round 45: *SC in the first 2 sts, INV DEC*, *rep around (18)
Rounds 46-51: SC around (18)
Round 52: *SC in the first 2 sts, SC INC in the next*, *rep around (24)
Round 53: *SC in the first 3 sts, SC INC in the next*, *rep around (30)
Round 54: *SC in the first 4 sts, SC INC in the next*, *rep around (36)
Round 55: *SC in the first 5 sts, SC INC in the next*, *rep around (42)
Round 56: *SC in the first 6 sts, SC INC in the next*, *rep around (48)
Round 57: *SC in the first 7 sts, SC INC in the next*, *rep around (54)
Rounds 58-66: SC around (54)
NOTE - Here is where we will attach the facial features. Place the safety eyes 6 sts apart between rounds 63 and 64. Add eyebrows/eyelashes to your liking before securing the backs of your safety eyes.
Nose – Sew your nose piece centered between the eyes adding stuffing as you go.
Cheeks – Sew cheeks just outside of your nose piece.

Round 68: *SC in the first 6 sts, INV DEC*, *rep around (42)
Round 69: *SC in the first 5 sts, INV DEC*, *rep around (36)
Round 70: *SC in the first 4 sts, INV DEC*, *rep around (30)
*Continue to stuff the head and neck firmly to avoid a wobbly head*
Round 71: *SC in the first 3 sts, INV DEC*, *rep around (24)
Round 72: *SC in the first 2 sts, INV DEC*, *rep around (18)
Round 73: *SC in the first st, INV DEC*, *rep around (12)
Round 74: INV DEC around (6)
Fasten off and sew remaining hole closed, weave in your end.
Ears-
With accent color make 2
Round 1: Create a magic circle with 8 SC
Rounds 2-3: SC around (8 SC)
Round 4: *SC in the first st, SC INC in the next*, *rep around (12 SC)
Round 5: SC around (12 SC)
Round 6: *SC in the first 2 sts, SC INC in the next*, *rep around (16 SC)
Rounds 7-12: SC around (16 SC)
Fold ear in half and SC across the top as pictured, then fasten off leaving a long tail for sewing.

Arms- Make 2
*Lightly stuff the bottom half of the arms*
With accent color
Round 1: Create a magic circle with 6 SC
Round 2: SC INC in each stitch around (12)
Rounds 3-6: SC around (12)
Change to body color
Rounds 7-22: SC around (12)
At the end of round 22 pinch the arm flat and make 6 SC across the top to close, fasten off and leave a long tail to sew onto the body.

Tail-
With accent color
Round 1: Create a magic circle with 8 SC
Round 2: SC INC in each st around (16)
Rounds 3-7: SC around (16)
Fasten off leaving a long tail for sewing.
Scarf-
With color of choice and 5mm hook, chain 78
Row 1: HDC in the 2nd chain from hook and in each chain across, chain 1 and turn (77)
Rows 2-3: HDC across (77)
Cut 4 strands of yarn about 6 inches long, slip st each strand into the ends of the scarf to create a fringe (I left my starting and ending yarn there as fringe, no need to weave them in). Cut the strands to even length.
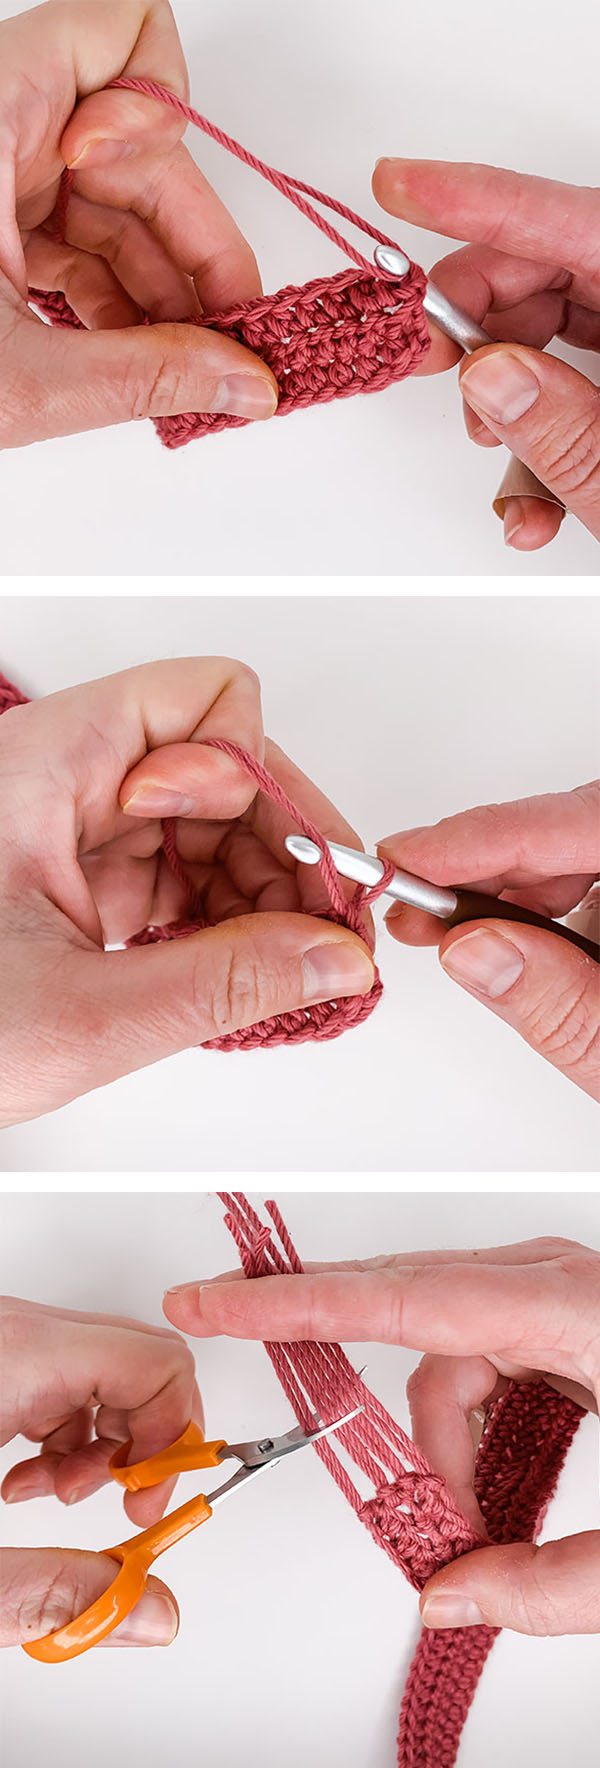
Assembly -
- Sew the ears onto each side of the head at the 5th round from the top.
- With body color we will make the “woolly” patch between the ears.
- Create a slip knot and slip st into the st closest to the ear as pictured below.
- Chain 16 and slip st into the next st.
- Continue this process until you reach the other ear (completes one row of “wool”).
- Slip st into the next st towards the back of the head to make one more row back across to the first ear. Feel free to add additional rows to your liking.

- Next, sew the arms onto the body centered with the head at round 42.
- Sew the tail to the back of the body, adding stuffing as you go.
- Lastly, I folded the scarf in half around the neck and pulled the ends through the loop.

Your llama is complete! I hope you have enjoyed making this pattern. Let me know if you have any questions with this pattern or any of my other patterns, I would be happy to help.
Thanks so much for stopping by!
- Stephanie


The Llama made with the multi colored yarn would be a perfect gift for a friend of mine. What yarn did you use?
ReplyDeleteI loved using this yarn! It's I Love This Yarn by Hobby Lobby in Sherbet Stripes!
ReplyDeleteCan you make it without the scarf?
ReplyDeleteYes, absolutely!
DeleteI made this llama over the weekend and I am in love. Thank you for your lovely pattern!
ReplyDeleteI made the girl Llama with a red rose in her hair and put a red dress I crocheted on her instead of a scarf. I love this project it was so fun!!! Keep up the great work!!!
ReplyDeleteSounds soo cute! I'm so glad you enjoyed the pattern, thank you for your kind words!
DeleteMuito obrigada. Parabéns pela aula.
ReplyDeleteI loved this pattern. Thank you so much :)
ReplyDeleteEasy to follow pattern, i loved how my llama turned out. Thank you so much Stephanie!
ReplyDeleteThanks for sharing. Can't wait to start
ReplyDeleteLoved this pattern. Very easy to follow and I loved the end result!
ReplyDeleteCan't wait to try this cutie for my grandson!
ReplyDelete