
I can't believe we are already more than halfway through July which means we are at pattern #3 in our Christmas in July series.
You can find all of the other Christmas patterns here!
You can find all of the other Christmas patterns here!
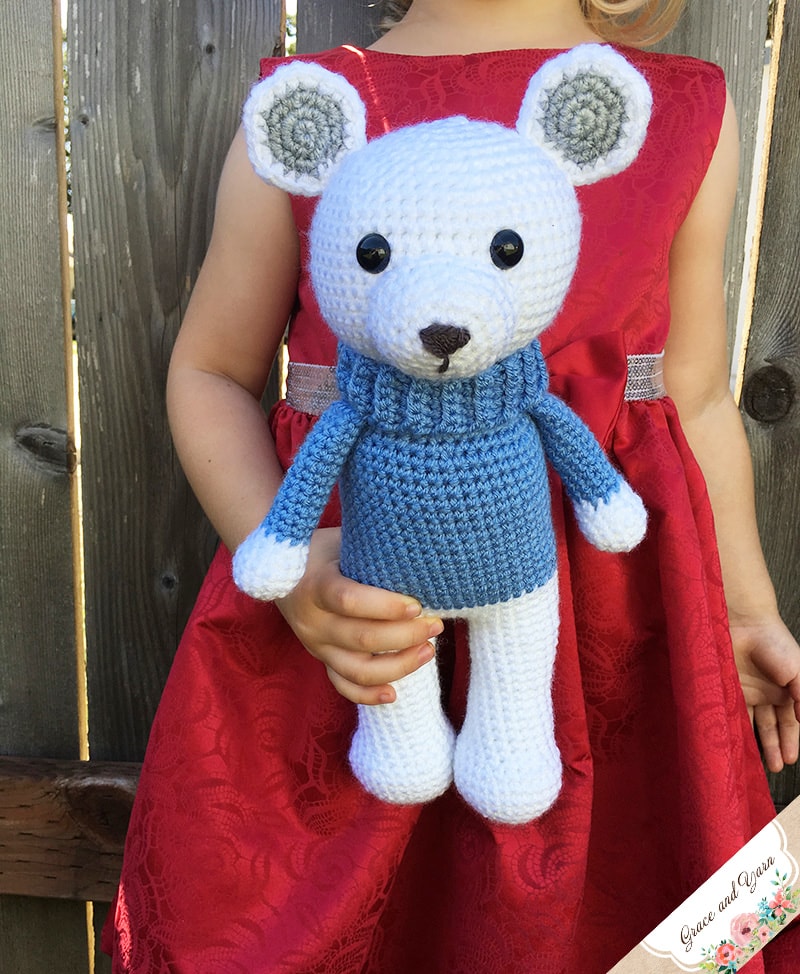
I'm excited to introduce you to Patrick the Polar Bear! He is similar in size to Ray the Reindeer, about 13 inches tall and would make a great Christmas gift!
If you are new to amigurumi be sure to check out my tips page to help you get started!
Patrick's pattern calls for size 12mm plastic safety eyes, but if you plan to make this for an infant feel free to check out my tutorial for crochet thread eyes as an alternative!
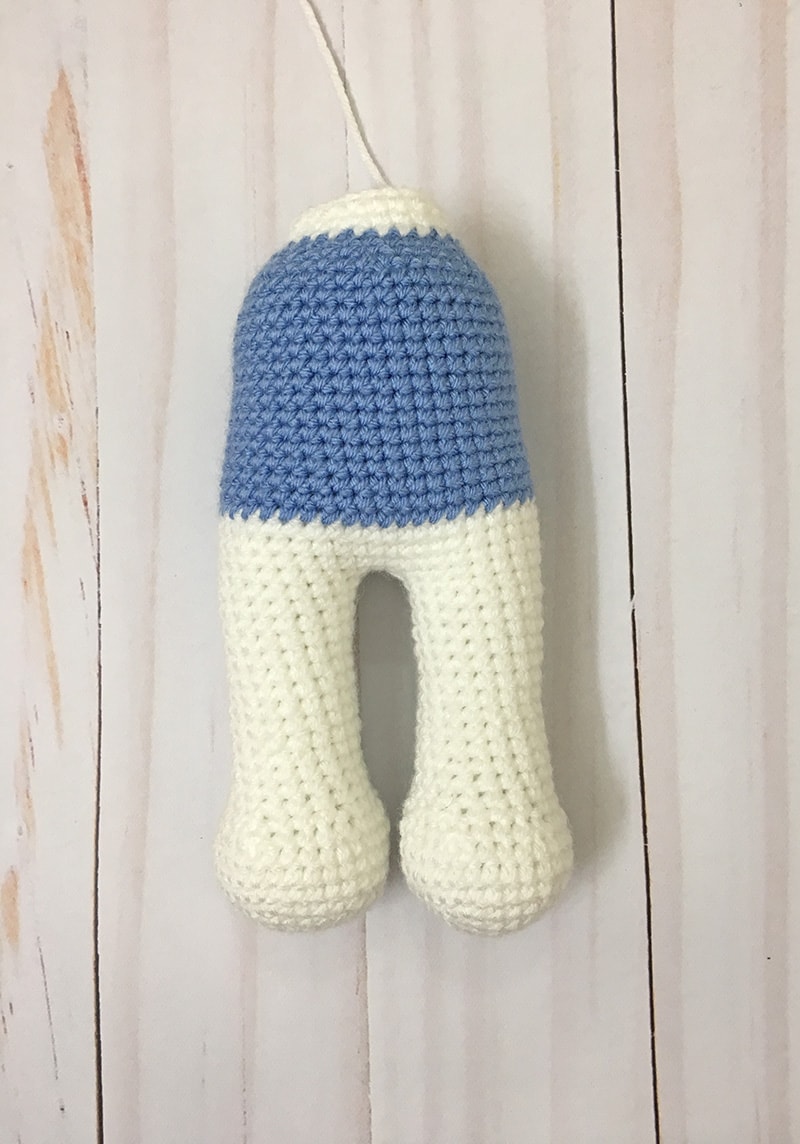
The legs and body are made as one to save a little time on sewing. The ears are also doubled up for added strength to avoid floppiness! Add eyelashes or a bow to make a girl version!
Be sure to also join the Grace and Yarn Crochet Group on Facebook. Share your projects, get inspiration and ask questions as you go!
Pattern
- PIN this pattern to your favorite board to save for later
You may make and sell items made from this pattern but please do not sell, share or reproduce the actual pattern. If you sell finished items online (Etsy, etc) please provide a link to the pattern and credit to me as the designer, thank you. I hope you enjoy this pattern!
This post contains affiliate links, please click here for more info. Thank you for supporting Grace and Yarn!
- Size 4 worsted weight yarn
- 100g of white (I used I Love This Yarn)
- 25g sweater color (I used I Love This Yarn in Medium Blue)
- Small amount of light grey for the ears
- Small amount of black or dark grey yarn for the nose
- 3.5 mm crochet hook
- 12 mm safety eyes
- Scissors and
- Tapestry needle (these bent tips are my favorite for amigurumi!)
- Stuffing (Morning Glory or Poly-Fil both work great!)
- Stitch markers
(If you're curious, I've shared why these are my favorite materials here!)
Abbreviations: US terminology
SC- Single crochet
SC INC- Single crochet increase
INV DEC- Invisible decrease
BLO – Back loop only
CH - Chain
This polar bear measures about 13 inches tall.
*Slowly stuff as you go, you want it to be firm but not stretched. You will be working in the round, I like using a stitch marker at the beginning of each round.
Legs: Make 2 - Using white
Round 1: Create a magic circle with 6 SC
Round 2: SC INC in each stitch (12 SC)
Round 3: SC in the first stitch, SC INC in the next stitch, rep around (18 SC)
Round 4: SC in the first 2 stitches, SC INC in the next stitch, rep around (24 SC)
Round 5: SC in the first 3 stitches, SC INC in the next stitch, rep around (30 SC)
Rounds 6-8: SC around (30 SC)
Round 9: SC in the first 3 stitches, INV DEC in the next, rep around (24 SC)
Round 10: SC in the first 2 stitches, INV DEC in the next, rep around (18 SC)
Rounds 11-23: SC around (18 SC)
Fasten off (when you finish the 2nd leg do not fasten off, proceed to round 24)
*Round 24 joins the legs together and starts the body
Round 24: Chain 3 and attach to the first leg with a SC, SC in the remaining stitches around the leg, when you reach the chain make a SC across each of the 3 chains, SC in the remaining stitches of the next leg and SC across each of the 3 chains (42 SC) This completes your join and is where your next round will start. (Example below of a leg join)

Rounds 25-29: SC around (42 SC)
Change to sweater color
Rounds 30-43: SC around (42 SC)
Round 44: SC in the first 5 stitches, INV DEC, rep around (36 SC)
Round 45: SC in the first 4 stitches, INV DEC, rep around (30 SC)
Round 46: SC around (30 SC)
Change to white
Round 47: SC in the first 3 stitches, INV DEC, rep around (24 SC)
Rounds 48-49: SC around (24 SC)
Fasten off and leave a long tail for sewing
Head
With white
Round 1: Create a magic circle with 6 SC
Round 2: SC INC in each stitch around (12 SC)
Round 3: SC in the first stitch, SC INC in the next, rep around (18 SC)
Round 4: SC in the first 2 stitches, SC INC in the next, rep around (24 SC)
Round 5: SC in the first 3 stitches, SC INC in the next, rep around (30 SC)
Round 6: SC in the first 4 stitches, SC INC in the next, rep around (36 SC)
Round 7: SC in the first 5 stitches, SC INC in the next, rep around (42 SC)
Round 8: SC in the first 6 stitches, SC INC in the next, rep around (48 SC)
Round 9: SC in the first 7 stitches, SC INC in the next, rep around (54 SC)
Rounds 10-18: SC around (54 SC)
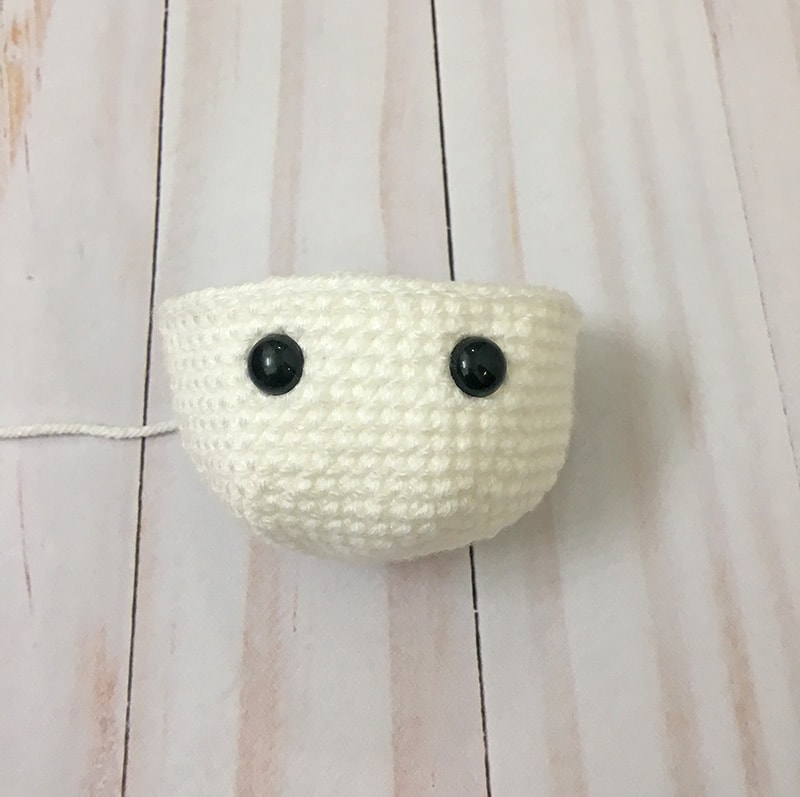
Note: Here is where we will add the eyes before we start closing the head. Insert the eyes between rows 15 and 16, 6 stitches apart.
Round 19: SC in the first 7 stitches, INV DEC in the next, rep around (48 SC)
Round 20: SC in the first 6 stitches, INV DEC in the next, rep around (42 SC)
Round 21: SC in the first 5 stitches, INV DEC in the next, rep around (36 SC)
Round 22: SC in the first 4 stitches, INV DEC in the next, rep around (30 SC)
Round 23: SC in the first 3 stitches, INV DEC in the next, rep around (24 SC) *Continue to stuff the head firmly
Round 24: SC in the first 2 stitches, INV DEC in the next, rep around (18 SC)
Round 25: SC in the first stitch, INV DEC in the next, rep around (12 SC)
Round 26: INV DEC around (6 SC)
Fasten off and sew remaining part closed, weave in your end
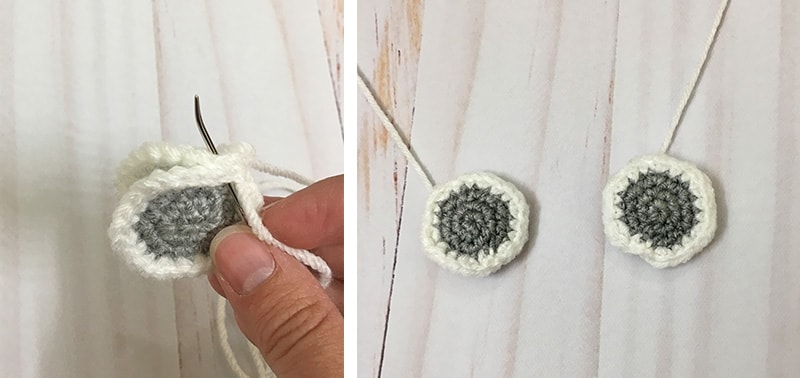
Ears
Make two front and two back pieces
Rounds 30-43: SC around (42 SC)
Round 44: SC in the first 5 stitches, INV DEC, rep around (36 SC)
Round 45: SC in the first 4 stitches, INV DEC, rep around (30 SC)
Round 46: SC around (30 SC)
Change to white
Round 47: SC in the first 3 stitches, INV DEC, rep around (24 SC)
Rounds 48-49: SC around (24 SC)
Fasten off and leave a long tail for sewing
Head
With white
Round 1: Create a magic circle with 6 SC
Round 2: SC INC in each stitch around (12 SC)
Round 3: SC in the first stitch, SC INC in the next, rep around (18 SC)
Round 4: SC in the first 2 stitches, SC INC in the next, rep around (24 SC)
Round 5: SC in the first 3 stitches, SC INC in the next, rep around (30 SC)
Round 6: SC in the first 4 stitches, SC INC in the next, rep around (36 SC)
Round 7: SC in the first 5 stitches, SC INC in the next, rep around (42 SC)
Round 8: SC in the first 6 stitches, SC INC in the next, rep around (48 SC)
Round 9: SC in the first 7 stitches, SC INC in the next, rep around (54 SC)
Rounds 10-18: SC around (54 SC)
Note: Here is where we will add the eyes before we start closing the head. Insert the eyes between rows 15 and 16, 6 stitches apart.
Round 19: SC in the first 7 stitches, INV DEC in the next, rep around (48 SC)
Round 20: SC in the first 6 stitches, INV DEC in the next, rep around (42 SC)
Round 21: SC in the first 5 stitches, INV DEC in the next, rep around (36 SC)
Round 22: SC in the first 4 stitches, INV DEC in the next, rep around (30 SC)
Round 23: SC in the first 3 stitches, INV DEC in the next, rep around (24 SC) *Continue to stuff the head firmly
Round 24: SC in the first 2 stitches, INV DEC in the next, rep around (18 SC)
Round 25: SC in the first stitch, INV DEC in the next, rep around (12 SC)
Round 26: INV DEC around (6 SC)
Fasten off and sew remaining part closed, weave in your end
Ears
Make two front and two back pieces
Front
With light grey
With light grey
Round 1: Create a magic circle with 6 SC
Round 2: SC INC in each stitch around (12 SC)
Round 3: SC in the first stitch, SC INC in the next, rep around (18 SC) Change to white
Round 4: SC in the first 2 stitches, SC INC in the next, rep around (24 SC)
Fasten off and leave a long tail for sewing
Back
With white
Round 1: Create a magic circle with 6 SC
Round 2: SC INC in each stitch around (12 SC)
Round 3: SC in the first stitch, SC INC in the next, rep around (18 SC)
Round 4: SC in the first 2 stitches, SC INC in the next, rep around (24 SC)
Fasten off and leave a long tail for sewing
Round 2: SC INC in each stitch around (12 SC)
Round 3: SC in the first stitch, SC INC in the next, rep around (18 SC) Change to white
Round 4: SC in the first 2 stitches, SC INC in the next, rep around (24 SC)
Fasten off and leave a long tail for sewing
Back
With white
Round 1: Create a magic circle with 6 SC
Round 2: SC INC in each stitch around (12 SC)
Round 3: SC in the first stitch, SC INC in the next, rep around (18 SC)
Round 4: SC in the first 2 stitches, SC INC in the next, rep around (24 SC)
Fasten off and leave a long tail for sewing
Sewing the ears together-
Place a front and back ear with wrong sides facing each other and sew together. Complete this step with the second ear.
Muzzle
With white
Round 1: Create a magic circle with 6 SC
Round 2: SC INC in each stitch (12 SC)
Round 3: SC in the first stitch, SC INC in the next, rep around (18 SC)
Round 4: SC in the first 2 stitches, SC INC in the next, rep around (24 SC)
Rounds 5-6: SC around (24 SC)
Fasten off leaving a long tail for sewing
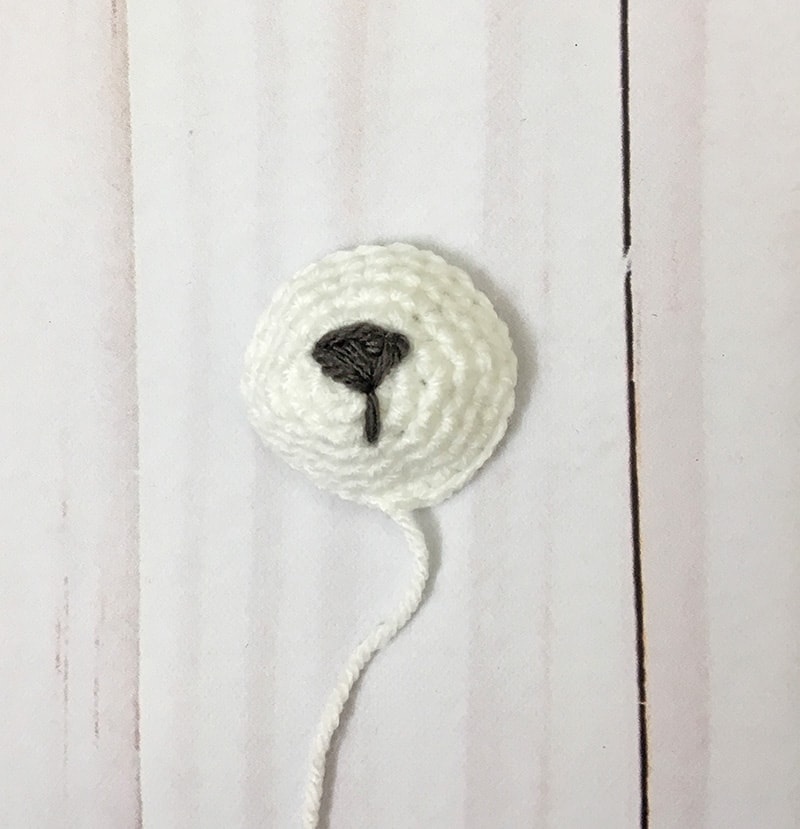
Nose
Take your black or dark grey yarn; make a ‘V’ and pass through across as shown below. Pass through a few more times from the bottom center to the top until your nose is filled in. Lastly pass your yarn through two stitches below.
Arms
Make 2
*Lightly stuff the bottom of the arms only*
With white
Round 1: Create a magic circle with 6 SC
Round 2: SC INC in each stitch around (12 SC)
Round 3: SC in the first 3 stitches, SC INC, rep around (15 SC)
Rounds 4-5: SC around (15 SC)
Round 6: SC in the first stitch, INV DEC, rep around (10 SC)
Round 7: SC around (10 SC) Change to sweater color
Rounds 8-20: SC around (10 SC)
At the end of round 20 pinch the arm flat and make 5 SC across the top to close, fasten off and leave a long tail to sew onto the body.

Assembling the head-
1. Sew the muzzle centered between the eyes, lightly stuff as you go
2. Sew the ears on starting at round 6 and ending at round 9 on each side

Assembling the body -
Sew the head onto the body, making sure to have the facial features centered. Add extra stuffing as you go to keep it firm and less wobbly. Next sew the arms onto the body centered with the head at round 46.
Collar
The last piece is to make the collar of the sweater, it’s the last step as having the bear fully stuffed will help us determine the length.
With your sweater color-
Row 1: Chain 6, SC in the 2nd chain from your hook and in each across, ch 1 and turn (5 SC)
Row 2: SC across in the blo, ch 1 and turn (5 SC)
Repeat row 2 until your collar is long enough to reach around the neck (mine was a total of 38 rows, because everyone crochets with a different tension your number may be different).
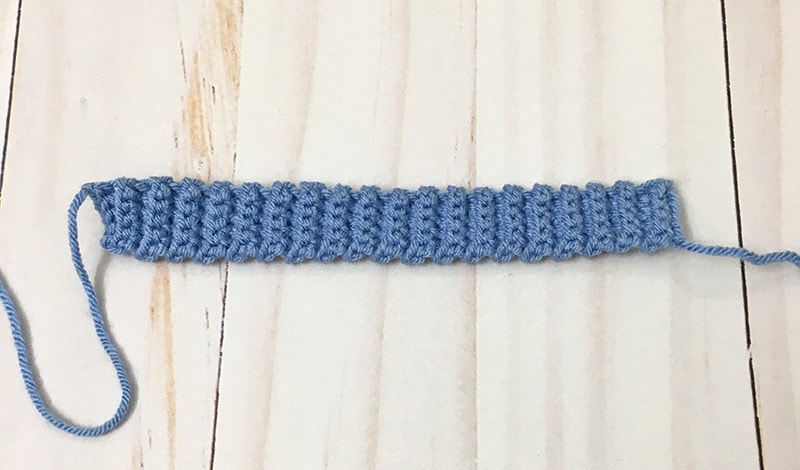
Fasten off with a long tail, place around the neck and sew two ends together. (Optional: Sew onto the body.)

Place a front and back ear with wrong sides facing each other and sew together. Complete this step with the second ear.
Muzzle
With white
Round 1: Create a magic circle with 6 SC
Round 2: SC INC in each stitch (12 SC)
Round 3: SC in the first stitch, SC INC in the next, rep around (18 SC)
Round 4: SC in the first 2 stitches, SC INC in the next, rep around (24 SC)
Rounds 5-6: SC around (24 SC)
Fasten off leaving a long tail for sewing
Nose
Take your black or dark grey yarn; make a ‘V’ and pass through across as shown below. Pass through a few more times from the bottom center to the top until your nose is filled in. Lastly pass your yarn through two stitches below.
Arms
Make 2
*Lightly stuff the bottom of the arms only*
With white
Round 1: Create a magic circle with 6 SC
Round 2: SC INC in each stitch around (12 SC)
Round 3: SC in the first 3 stitches, SC INC, rep around (15 SC)
Rounds 4-5: SC around (15 SC)
Round 6: SC in the first stitch, INV DEC, rep around (10 SC)
Round 7: SC around (10 SC) Change to sweater color
Rounds 8-20: SC around (10 SC)
At the end of round 20 pinch the arm flat and make 5 SC across the top to close, fasten off and leave a long tail to sew onto the body.
Assembling the head-
1. Sew the muzzle centered between the eyes, lightly stuff as you go
2. Sew the ears on starting at round 6 and ending at round 9 on each side
Assembling the body -
Sew the head onto the body, making sure to have the facial features centered. Add extra stuffing as you go to keep it firm and less wobbly. Next sew the arms onto the body centered with the head at round 46.
Collar
The last piece is to make the collar of the sweater, it’s the last step as having the bear fully stuffed will help us determine the length.
With your sweater color-
Row 1: Chain 6, SC in the 2nd chain from your hook and in each across, ch 1 and turn (5 SC)
Row 2: SC across in the blo, ch 1 and turn (5 SC)
Repeat row 2 until your collar is long enough to reach around the neck (mine was a total of 38 rows, because everyone crochets with a different tension your number may be different).
Fasten off with a long tail, place around the neck and sew two ends together. (Optional: Sew onto the body.)
Your polar bear is done! I hope you enjoyed this pattern! If you made your own Patrick share a picture with us in the Grace and Yarn Crochet Group, we'd love to see it!
Thanks for stopping by!
~Stephanie


Esta hermoso
ReplyDelete