
This post may contain affiliate links, please see our disclosure for more information. Thank you so much for supporting Grace & Yarn!
Happy Thursday! Our first pattern for our Christmas in July 2022 event releases today!
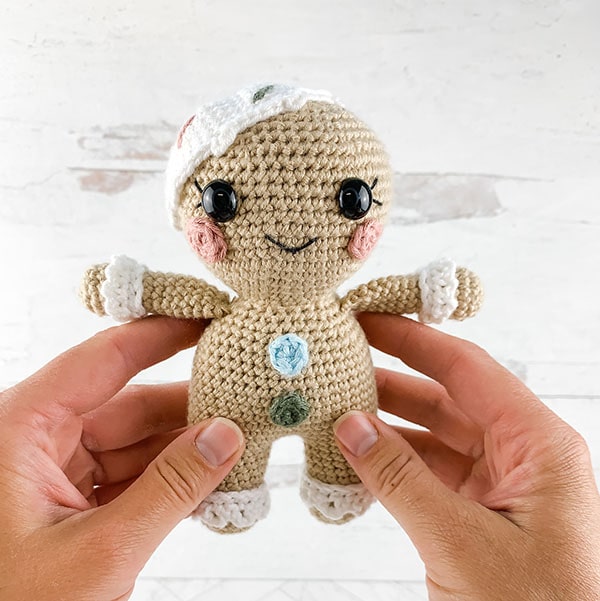
Meet Nutmeg, our mini amigurumi gingerbread doll! Her icing just might be my favorite detail with those drips of lace! She was partly inspired by our larger dolls, Ginger and Snap!
Each July the sweet Amanda of Loops and Love Crochet and I team up to bring you 4 new fun and free patterns to get a head start on your Winter makes. Whether you're looking for some homemade gifts, items to prepare for a craft fair or to use in your decor we have you covered!
For more details on our event head to this page here!

I used a new to me yarn to make Nutmeg, Coboo by Lion Brand Yarn. It has a beautiful feel to it while working and when finished, plus I had some in my stash that I was ready to dive into.
Coboo is 50% cotton and 50% bamboo which brings it's nice sheen and soft feel. It's also on the thinner side being a weight category of 3. You'll see below that I recommend a worsted weight 4 for this pattern (it's the yarn I usually use for all of my amigurumi patterns) but both sizes would work great!
In fact, Nutmeg would also be super cute in a chunky or blanket yarn as well! If you're sizing up to a blanket yarn I recommend using a 6mm hook and 18mm or 20mm safety eyes.
The only downside I found when working with Coboo is that it had a tendency to split. I didn't have much of this problem until it came time for assembly. Trying to get the yarn ends through my tapestry needle gave me a little trouble but not enough to discourage me from using it again in more projects.
If you're new to amigurumi this is a fun project to start out on. The legs, body and head are made as one piece and sewing is a breeze! Be sure to also check out these helpful tutorials to walk you through the different methods we'll be using throughout the pattern!
Don't want to miss a new pattern?
Stay in touch through these platforms below!
Instagram - Facebook - Pinterest - Newsletter - Grace & Yarn Crochet Group
Pattern
PIN here to save for later
Grab the ad-free printable PDF in my Etsy or Ravelry shop
(Continue scrolling for the free version here on the blog
You may make and sell items made from this pattern but please do not sell, share or reproduce the actual pattern. If you sell finished items online (Etsy, etc) please provide a link to the pattern and credit to me as the designer, thank you. I hope you enjoy this pattern!
Materials -
- Size 4 worsted weight yarn (100 yards of beige; small amount of white, pink, green and blue)
- 3.5 mm crochet hook
- 12mm safety eyes
- Black crochet/embroidery thread for eyelashes/smile
- Scissors
- Tapestry needle
- Stuffing
- Stitch markers
Abbreviations - US terminology
MC- Magic circle
SC- Single crochet
HDC – Half double crochet
SC INC- Single crochet increase
INV DEC- Invisible decrease
St(s)- Stitch(es)
Ch – Chain
Rep - Repeat

NOTES -
- Finished mini gingerbread doll measures approximately 8 inches tall.
- Slowly stuff as you go, you want it to be firm but not stretched. You will be working in the round; I like to use a stitch marker at the beginning of each round.
- The legs, body and head will be made as one piece.
- Yarn used in photos are Lion Brand Coboo in Tan, Ice Blue, Olive, Mauve, and White
Cheeks – Make 2
With pink/red
Round 1: Create a magic circle with 6 HDC, pull tight to close and secure with a slip stitch to the first HDC
Fasten off leaving a long tail for sewing.
Legs - Make 2
With beige
Round 1: Create a magic circle with 6 SC
Round 2: SC INC in each st (12)
Round 3: SC in the first st, SC INC in the next, rep around (18)
Rounds 4-12: SC around (18)
Fasten off on the first leg. When you complete the 2nd leg continue to round 13 to join the legs.
Round 13: Chain 3 and attach to the first leg with a SC. SC in the remaining stitches around the leg. When you reach the chain make a SC across each of the 3 chains. SC in the remaining stitches of the next leg and SC across each of the 3 chains again. You will have crocheted on each side of the chain. (42 SC) This completes your join and is where your next round will start.

Rounds 14-24: SC around (42)
Round 25: SC in the first 5 sts, INV DEC in the next, rep around (36)
Round 26: SC in the first 4 sts, INV DEC in the next, rep around (30)
Round 27: SC around (30)
Round 28: SC in the first 3 sts, INV DEC in the next, rep around (24)
Round 29: SC in the first 2 sts, INV DEC in the next, rep around (18)
Here is where we will start the head.
Round 30: SC in the first 2 sts, SC INC in the next, rep around (24)
Round 31: SC in the first 3 sts, SC INC in the next, rep around (30)
Round 32: SC in the first 4 sts, SC INC in the next, rep around (36)
Round 33: SC in the first 5 sts, SC INC in the next, rep around (42)
Round 34: SC in the first 6 sts, SC INC in the next, rep around (48)
Round 35: SC in the first 7 sts, SC INC in the next, rep around (54)
Rounds 36-43: SC around (54)
Round 44: SC in the first 7 sts, INV DEC in the next, rep around (48)
NOTE - Here is where we will attach the facial features. Place the safety eyes 7 stitches apart between rounds 40 and 41. Add eyebrows/eyelashes to your liking before securing the backs of your safety eyes.
Smile – With your black embroidery/crochet thread create a smile by making a “V” centered between the eyes. I made mine a row below my eyes.
Cheeks – Sew cheeks just outside of your smile and below each eye.

Round 45: SC in the first 6 sts, INV DEC in the next, rep around (42)
Round 46: SC in the first 5 sts, INV DEC in the next, rep around (36)
Round 47: SC in the first 4 sts, INV DEC in the next, rep around (30)
Round 48: SC in the first 3 sts, INV DEC in the next, rep around (24)
*Continue to stuff the head and neck firmly to avoid a wobbly head*
Round 49: SC in the first 2 sts, INV DEC in the next, rep around (18)
Round 50: SC in the first st, INV DEC in the next, rep around (12)
Round 51: INV DEC around (6)
Fasten off and sew remaining hole closed, weave in your end.
Arms-
Make 2 stuffing lightly at the bottom
With beige
Round 1: Create a magic circle with 6 SC
Round 2: SC INC in each stitch around (12)
Round 3: SC in the first 3 sts, SC INC in the next, rep around (15)
Round 4: SC around (15)
Round 5: SC in the first stitch, INV DEC in the next, rep around (10)
Rounds 6-14: SC around (10)
At the end of round 14 pinch the arm flat and make 5 SC across the top to close, fasten off and leave a long tail to sew onto the body.

Candy Drops -Make 2
With color of choice
Round 1: Create a magic circle with 6 HDC, pull tight to close and secure with a slip stitch to the first HDC
Fasten off leaving a long tail for sewing.

Frosting Cap –
With white
Round 1: Create a magic circle with 6 SC
Round 2: SC INC in each st (12)
Round 3: SC in the first st, SC INC in the next, rep around (18)
Round 4: SC in the first 2 sts, SC INC in the next, rep around (24)
Round 5: SC in the first 3 sts, SC INC in the next, rep around (30)
Round 6: SC in the first 4 sts, SC INC in the next, rep around (36)
Round 7: SC in the first 5 sts, SC INC in the next, rep around (42)
Round 8: SC in the first 6 sts, SC INC in the next, rep around (48)
Rounds 9-10: SC around (48)
Round 11: *SC in the first 5 sts, ch 3 and SC into the next st*, *rep around
Fasten off leaving a long tail for sewing. With colors of choice cut 9 strands of yarn approximately 5 inches long (I used 3 strands of each accent color). With your tapestry needle pass through a few stitches on your frosting cap one by one with each strand and tie in a knot underneath to secure. This will be our ‘sprinkles’.

Frosting Accent for Legs – Make 2
With white
Row 1: Ch 17, SC in the 2nd ch on your hook and into each ch across, ch 1 and turn (16)
Row 2: *SC into the first st, ch 3, SC into the next st*, *rep across
Fasten off leaving a long tail for sewing

Frosting Accent for Arms – Make 2
With white
Row 1: Ch 11, SC into the 2nd ch on your hook and into each ch across, ch 1 and turn (10)
Row 2: *SC into the first st, ch 2, SC into the next st*, *rep across
Fasten off leaving a long tail for sewing
Assembly –
- Sew the frosting cap onto the head tilted to one side just above the eye.
- Next, sew the frosting accents onto the arms. I attached the top of the frosting piece to the 6th round.
- Sew the arms onto the body centered with the head at round 27.
- Now for the legs, we will sew our frosting accents in similar fashion as we did for the arms on round 7 on each leg.
- Lastly, sew your candy drops onto the middle of the body one above the other.

Your mini gingerbread is complete! Thank you so much for stopping by! Nutmeg is our first of 4 patterns that will be released this month so stay tuned for more to come. You can find all of the dates and details for Christmas in July 2022 in our post here!


Thank you. She is precious
ReplyDeleteWhat a sweet doll! Thank you for sharing.
ReplyDelete