

This post may contain affiliate links, please see our disclosure for more information. Thank you so much for supporting Grace & Yarn!
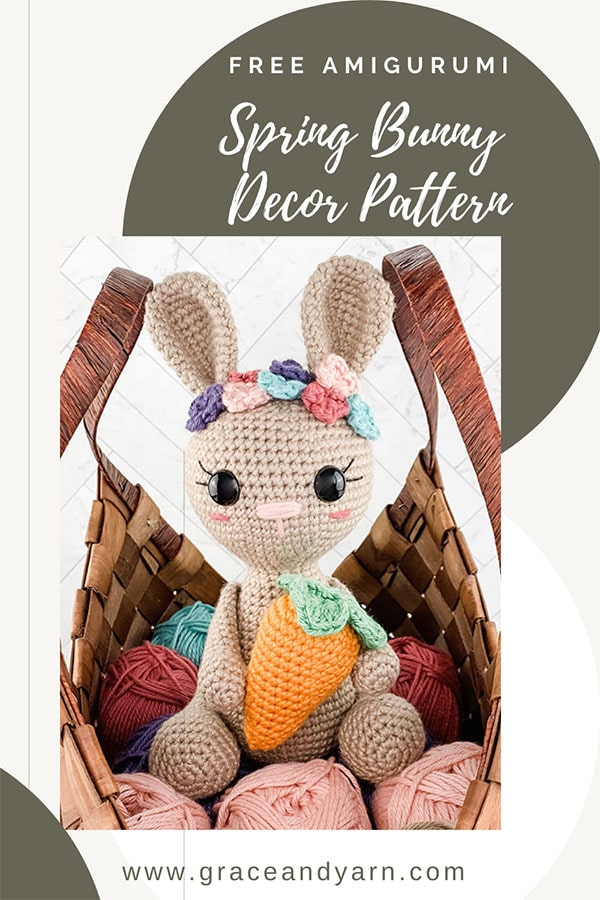
Happy Friday friends! Who's ready to add a pop (and hop) of color to your Spring decor?! When I think of Spring, bunnies always come to mind.
It's probably why you can find so many bunny inspired patterns on the blog (Berry Patch Bunnies - Boy and Girl Version - Mini Berry Patch Bunnies - Bunny Headband). It was only natural we needed a shelf sitting bunny so we could mix it in with our favorite Spring decor on a shelf, table or desk!
I've also used a weighted base in the body to help her to stay in place. If you haven't used a weighted base before I'll walk you through it below!
If you're new to amigurumi this is a great pattern to start with. The body and head are made as one piece and by closing up the limbs it makes sewing a breeze!
Don't want to miss a new pattern?
Stay in touch through these platforms below!
Instagram - Facebook - Pinterest - Newsletter - Grace & Yarn Crochet Group
Pattern
PIN here to save for later
Grab the ad-free printable PDF in my Etsy or Ravelry shop
(Continue scrolling for the free version here on the blog
You may make and sell items made from this pattern but please do not sell, share or reproduce the actual pattern. If you sell finished items online (Etsy, etc) please provide a link to the pattern and credit to me as the designer, thank you. I hope you enjoy this pattern!
Materials -
Abbreviations - US terminology
SC- Single crochet
SC INC- Single crochet increase
INV DEC- Invisible decrease
HDC- Half double crochet
DC – Double crochet
TR – Triple crochet
Ch – Chain
Rep – Repeat
St(s) – Stitch(es)

This pattern was designed for the Spring Style Blog Hop hosted by Itchin' For Some Stitchin', Ned and Mimi and HanJan Crochet and sponsored by WeCrochet. A new pattern is featured each day for the month of March, all full of Spring inspiration!
If you've missed some patterns along the way or hopping to each blog isn't your thing you can grab all 33 patterns in the Spring Style Bundle here!
Notes -
· Yarn used in pattern is WeCrochet Comfy Worsted in the colors Parchment, Flamingo, Peony, Peapod, Carrot, Vinca, and Seafoam.
· Spring Bunny measures 8.5 inches tall. Difference in tension, yarn or hook size may produce a slightly taller or shorter finished product.
· Slowly stuff as you go, you want it to be firm but not stretched. You will be working in a continuous round; I recommend using a stitch marker at the beginning or end of each round.
· For this pattern the body and head will be made as one piece.
Optional Weighted Base –
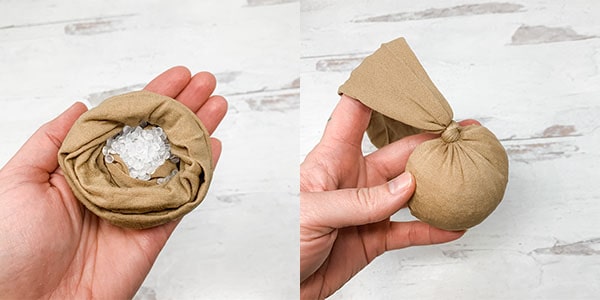
Adding a weighted base will help your Spring Bunny to sit on a shelf or flat surface if using as Spring décor. You’ll need a knee-high stocking and approx. 1/3 cup of poly-pellets. Pour your poly-pellets into your stocking and create a knot to close. This will be inserted after round 21 of the body.
Body-
With Parchment (beige)
Round 1: Create a magic circle with 6 SC
Round 2: SC INC in each stitch around (12)
Round 3: SC in the first stitch, SC INC in the next, rep around (18)
Round 4: SC in the first 2 sts, SC INC in the next, rep around (24)
Round 5: SC in the first 3 sts, SC INC in the next, rep around (30)
Round 6: SC in the first 4 sts, SC INC in the next, rep around (36)
Round 7: SC in the first 5 sts, SC INC in the next, rep around (42)
Round 8: SC in the first 6 sts, SC INC in the next, rep around (48)
Rounds 9-15: SC around (48)
Round 16: SC in the first 6 sts, INV DEC in the next, rep around (42)
Round 17-18: SC around (42)
Round 19: SC in the first 5 sts, INV DEC in the next, rep around (36)
Rounds 20-21: SC around (36)
(Optional: Insert weighted base)
Round 22: SC in the first 4 sts, INV DEC in the next, rep around (30)
Rounds 23-24: SC around (30)
Round 25: SC in the first 3 sts, INV DEC in the next, rep around (24)
Rounds 26-27: SC around (24)
Round 28: SC in the first 2 sts, INV DEC in the next, rep around (18)
Rounds 29-30: SC around (18)
*We will now start the head*
Round 31: SC in the first 2 sts, SC INC in the next, rep around (24)
Round 32: SC in the first 3 sts, SC INC in the next, rep around (30)
Round 33: SC in the first 4 sts, SC INC in the next, rep around (36)
Round 34: SC in the first 5 sts, SC INC in the next, rep around (42)
Round 35: SC in the first 6 sts, SC INC in the next, rep around (48)
Round 36: SC in the first 7 sts, SC INC in the next, rep around (54)
Rounds 37-45: SC around (54)
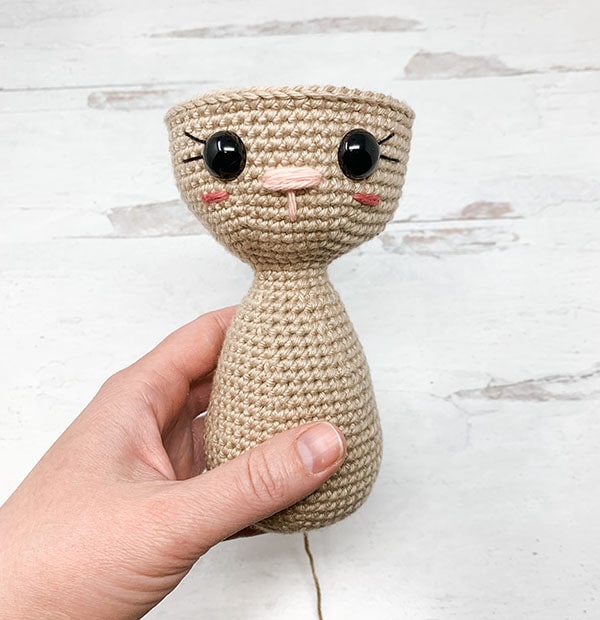
Note: Here is where we will add the facial features before we start closing the head. (If you would like eyelashes/eyebrows I recommend sewing them in place before securing the back onto your safety eyes.) Insert the eyes between rows 41 and 42, 7 sts apart.
Next, with a small piece of pink yarn and your tapestry needle, make 4-5 passes through the center 4 sts between the eyes. Make a straight pass from the nose to two rounds down for the mouth.
Lastly, create cheeks under each eye by passing through two sts.
Round 46: SC in the first 7 sts, INV DEC in the next, rep around (48)
Round 47: SC in the first 6 sts, INV DEC in the next, rep around (42)
Round 48: SC in the first 5 sts, INV DEC in the next, rep around (36)
Round 49: SC in the first 4 sts, INV DEC in the next, rep around (30)
Round 50: SC in the first 3 sts, INV DEC in the next, rep around (24)
*Continue to stuff the head firmly
Round 51: SC in the first 2 sts, INV DEC in the next, rep around (18)
Round 52: SC in the first stitch, INV DEC in the next, rep around (12)
Round 53: INV DEC around (6)
Fasten off and sew remaining part closed, weave in your end.
Ears –
Make 2
Round 1: Create a magic circle with 6 SC
Round 2: SC INC in each stitch around (12)
Round 3: SC in the first stitch, SC INC in the next, rep around (18)
Round 4: SC in the first 2 sts, SC INC in the next, rep around (24)
Round 5: SC in the first 3 sts, SC INC in the next, rep around (30)
Round 6: SC around (30)
Round 7: SC in the first 8 sts, INV DEC in the next, rep around (27)
Round 8: SC around (27)
Round 9: SC in the first 7 sts, INV DEC in the next, rep around (24)
Round 10: SC in the first 6 sts, INV DEC in the next, rep around (21)
Round 11: SC in the first 5 sts, INV DEC in the next, rep around (18)
Rounds 12-15: SC around (18)
Fold the ears in half and SC across the top to close, fasten off and leave a long tail for sewing.

Arms-
Make 2 - *Lightly stuff the bottom of the arms only*
Round 1: Create a magic circle with 6 SC
Round 2: SC INC in each stitch around (12)
Round 3: SC in the first 3 sts, SC INC in the next, rep around (15)
Rounds 4-5: SC around (15)
Round 6: SC in the first stitch, INV DEC in the next, repeat around (10)
Rounds 7-16: SC around (10)
At the end of round 16 pinch the arm flat and make 5 SC across the top to close, fasten off and leave a long tail to sew onto the body.
Legs -
Make 2 – *Firmly stuff the bottom of the legs only*
Round 1: Create a magic circle with 6 SC
Round 2: SC INC in each stitch around (12)
Round 3: SC in the first stitch, SC INC in the next, rep around (18)
Round 4: SC in the first 2 sts, SC INC in the next, rep around (24)
Round 5: SC in the first 3 sts, SC INC in the next, rep around (30)
Rounds 6-7: SC around (30)
Round 8: SC in the first 3 sts, INV DEC in the next, rep around (24)
Round 9: SC in the first 2 sts, INV DEC in the next, rep around (18)
Round 10: SC in the first 4 sts, INV DEC in the next, rep around (15)
Rounds 11-19: SC around (15)
At the end of round 19 pinch the leg flat and make 7 SC across the top to close, fasten off and leave a long tail to sew onto the body.

Tail –
Round 1: Create a magic circle with 6 SC
Round 2: SC INC in each stitch around (12)
Round 3: SC in the first stitch, SC INC in the next, rep around (18)
Round 4: SC in the first 2 sts, SC INC in the next, rep around (24)
Round 5: SC in the first 3 sts, SC INC in the next, rep around (30)
Rounds 6-8: SC around (30)
Round 9: SC in the first 3 sts, INV DEC in the next, rep around (24)
Round 10: SC in the first 2 sts, INV DEC in the next, rep around (18)
Round 11: SC in the first st, INV DEC in the next, rep around (12)
Fasten off leaving a long tail for sewing.
Flowers -
Make 8 in various colors of choice.
Round 1: Create a magic circle, complete the following inside: 2 DC, slip stitch (this completes one petal, repeat 4 more times for a total of 5 petals)
Pull the circle tight and slip stitch to the first petal to close, fasten off leaving a long tail for sewing.

Carrot –
Round 1: Create a magic circle with 6 SC
Round 2: SC INC in each stitch around (12)
Round 3: SC in the first stitch, SC INC in the next, rep around (18)
Round 4: SC in the first 2 sts, SC INC in the next, rep around (24)
Round 5: SC in the first 3 sts, SC INC in the next, rep around (30)
Rounds 6-7: SC around (30)
Round 8: SC in the first 8 sts, INV DEC in the next, rep around (27)
Round 9: SC around (27)
Round 10: SC in the first 7 sts, INV DEC in the next, rep around (24)
Round 11: SC around (24)
Round 12: SC in the first 6 sts, INV DEC in the next, rep around (21)
Round 13: SC in the first 5 sts, INV DEC in the next, rep around (18)
Round 14: SC around (18)
Round 15: SC in the first 4 sts, INV DEC in the next, rep around (15)
Round 16: SC around (15)
Round 17: SC in the first 3 sts, INV DEC in the next, rep around (12)
Round 18: SC around (12)
Round 19: SC in the first 2 sts, INV DEC in the next, rep around (9)
Round 20: SC in the first st, INV DEC in the next, rep around (6)
Fasten off and sew remaining part closed, weave in your end.
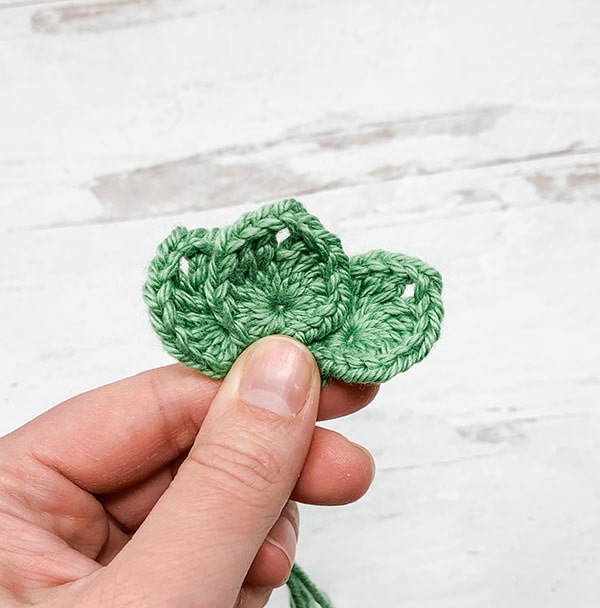
Leaves -
Make 3
Round 1: Complete the following inside of a magic circle; 2SC, 2HDC, 2DC, 3TR, Ch 1, 3TR, 2DC, 2HDC, 2SC. Pull tight to close and slip stitch to the first SC.
Fasten off leaving a long tail for sewing.
Assembly -
1. Sew the ears onto either side of the head at the 4th - 6th rounds from the top.
2. Next, sew the arms at round 26 (counting from the bottom). Give them a slight forward angle for holding the carrot.
3. Third, attach the legs at rounds 7-14 from the bottom.
4. Sew the leaves onto the top of your carrot. Optional: Sew the carrot to the tips of the arms for a permanent hold.
5. Attach the tail to the center back of your bunny.
6. Lastly, sew your flowers between the ears.

I've also used a weighted base in the body to help her to stay in place. If you haven't used a weighted base before I'll walk you through it below!
If you're new to amigurumi this is a great pattern to start with. The body and head are made as one piece and by closing up the limbs it makes sewing a breeze!
Don't want to miss a new pattern?
Stay in touch through these platforms below!
Instagram - Facebook - Pinterest - Newsletter - Grace & Yarn Crochet Group
Pattern
PIN here to save for later
Grab the ad-free printable PDF in my Etsy or Ravelry shop
(Continue scrolling for the free version here on the blog
You may make and sell items made from this pattern but please do not sell, share or reproduce the actual pattern. If you sell finished items online (Etsy, etc) please provide a link to the pattern and credit to me as the designer, thank you. I hope you enjoy this pattern!
Materials -
- Size 4 worsted weight yarn (see notes for specific yarn/colors used)
- 165 yards of beige
- Small amount of orange, green, pink, and choice colors for flowers
- 3.5 mm crochet hook
- 15mm safety eyes
- Black crochet/embroidery thread for the eyelashes
- Scissors
- Tapestry needle
- Stuffing
- Stitch markers
Abbreviations - US terminology
SC- Single crochet
SC INC- Single crochet increase
INV DEC- Invisible decrease
HDC- Half double crochet
DC – Double crochet
TR – Triple crochet
Ch – Chain
Rep – Repeat
St(s) – Stitch(es)
This pattern was designed for the Spring Style Blog Hop hosted by Itchin' For Some Stitchin', Ned and Mimi and HanJan Crochet and sponsored by WeCrochet. A new pattern is featured each day for the month of March, all full of Spring inspiration!
If you've missed some patterns along the way or hopping to each blog isn't your thing you can grab all 33 patterns in the Spring Style Bundle here!
Notes -
· Yarn used in pattern is WeCrochet Comfy Worsted in the colors Parchment, Flamingo, Peony, Peapod, Carrot, Vinca, and Seafoam.
· Spring Bunny measures 8.5 inches tall. Difference in tension, yarn or hook size may produce a slightly taller or shorter finished product.
· Slowly stuff as you go, you want it to be firm but not stretched. You will be working in a continuous round; I recommend using a stitch marker at the beginning or end of each round.
· For this pattern the body and head will be made as one piece.
Optional Weighted Base –
Adding a weighted base will help your Spring Bunny to sit on a shelf or flat surface if using as Spring décor. You’ll need a knee-high stocking and approx. 1/3 cup of poly-pellets. Pour your poly-pellets into your stocking and create a knot to close. This will be inserted after round 21 of the body.
Body-
With Parchment (beige)
Round 1: Create a magic circle with 6 SC
Round 2: SC INC in each stitch around (12)
Round 3: SC in the first stitch, SC INC in the next, rep around (18)
Round 4: SC in the first 2 sts, SC INC in the next, rep around (24)
Round 5: SC in the first 3 sts, SC INC in the next, rep around (30)
Round 6: SC in the first 4 sts, SC INC in the next, rep around (36)
Round 7: SC in the first 5 sts, SC INC in the next, rep around (42)
Round 8: SC in the first 6 sts, SC INC in the next, rep around (48)
Rounds 9-15: SC around (48)
Round 16: SC in the first 6 sts, INV DEC in the next, rep around (42)
Round 17-18: SC around (42)
Round 19: SC in the first 5 sts, INV DEC in the next, rep around (36)
Rounds 20-21: SC around (36)
(Optional: Insert weighted base)
Round 22: SC in the first 4 sts, INV DEC in the next, rep around (30)
Rounds 23-24: SC around (30)
Round 25: SC in the first 3 sts, INV DEC in the next, rep around (24)
Rounds 26-27: SC around (24)
Round 28: SC in the first 2 sts, INV DEC in the next, rep around (18)
Rounds 29-30: SC around (18)
*We will now start the head*
Round 31: SC in the first 2 sts, SC INC in the next, rep around (24)
Round 32: SC in the first 3 sts, SC INC in the next, rep around (30)
Round 33: SC in the first 4 sts, SC INC in the next, rep around (36)
Round 34: SC in the first 5 sts, SC INC in the next, rep around (42)
Round 35: SC in the first 6 sts, SC INC in the next, rep around (48)
Round 36: SC in the first 7 sts, SC INC in the next, rep around (54)
Rounds 37-45: SC around (54)
Note: Here is where we will add the facial features before we start closing the head. (If you would like eyelashes/eyebrows I recommend sewing them in place before securing the back onto your safety eyes.) Insert the eyes between rows 41 and 42, 7 sts apart.
Next, with a small piece of pink yarn and your tapestry needle, make 4-5 passes through the center 4 sts between the eyes. Make a straight pass from the nose to two rounds down for the mouth.
Lastly, create cheeks under each eye by passing through two sts.
Round 46: SC in the first 7 sts, INV DEC in the next, rep around (48)
Round 47: SC in the first 6 sts, INV DEC in the next, rep around (42)
Round 48: SC in the first 5 sts, INV DEC in the next, rep around (36)
Round 49: SC in the first 4 sts, INV DEC in the next, rep around (30)
Round 50: SC in the first 3 sts, INV DEC in the next, rep around (24)
*Continue to stuff the head firmly
Round 51: SC in the first 2 sts, INV DEC in the next, rep around (18)
Round 52: SC in the first stitch, INV DEC in the next, rep around (12)
Round 53: INV DEC around (6)
Fasten off and sew remaining part closed, weave in your end.
Ears –
Make 2
Round 1: Create a magic circle with 6 SC
Round 2: SC INC in each stitch around (12)
Round 3: SC in the first stitch, SC INC in the next, rep around (18)
Round 4: SC in the first 2 sts, SC INC in the next, rep around (24)
Round 5: SC in the first 3 sts, SC INC in the next, rep around (30)
Round 6: SC around (30)
Round 7: SC in the first 8 sts, INV DEC in the next, rep around (27)
Round 8: SC around (27)
Round 9: SC in the first 7 sts, INV DEC in the next, rep around (24)
Round 10: SC in the first 6 sts, INV DEC in the next, rep around (21)
Round 11: SC in the first 5 sts, INV DEC in the next, rep around (18)
Rounds 12-15: SC around (18)
Fold the ears in half and SC across the top to close, fasten off and leave a long tail for sewing.
Arms-
Make 2 - *Lightly stuff the bottom of the arms only*
Round 1: Create a magic circle with 6 SC
Round 2: SC INC in each stitch around (12)
Round 3: SC in the first 3 sts, SC INC in the next, rep around (15)
Rounds 4-5: SC around (15)
Round 6: SC in the first stitch, INV DEC in the next, repeat around (10)
Rounds 7-16: SC around (10)
At the end of round 16 pinch the arm flat and make 5 SC across the top to close, fasten off and leave a long tail to sew onto the body.
Legs -
Make 2 – *Firmly stuff the bottom of the legs only*
Round 1: Create a magic circle with 6 SC
Round 2: SC INC in each stitch around (12)
Round 3: SC in the first stitch, SC INC in the next, rep around (18)
Round 4: SC in the first 2 sts, SC INC in the next, rep around (24)
Round 5: SC in the first 3 sts, SC INC in the next, rep around (30)
Rounds 6-7: SC around (30)
Round 8: SC in the first 3 sts, INV DEC in the next, rep around (24)
Round 9: SC in the first 2 sts, INV DEC in the next, rep around (18)
Round 10: SC in the first 4 sts, INV DEC in the next, rep around (15)
Rounds 11-19: SC around (15)
At the end of round 19 pinch the leg flat and make 7 SC across the top to close, fasten off and leave a long tail to sew onto the body.
Tail –
Round 1: Create a magic circle with 6 SC
Round 2: SC INC in each stitch around (12)
Round 3: SC in the first stitch, SC INC in the next, rep around (18)
Round 4: SC in the first 2 sts, SC INC in the next, rep around (24)
Round 5: SC in the first 3 sts, SC INC in the next, rep around (30)
Rounds 6-8: SC around (30)
Round 9: SC in the first 3 sts, INV DEC in the next, rep around (24)
Round 10: SC in the first 2 sts, INV DEC in the next, rep around (18)
Round 11: SC in the first st, INV DEC in the next, rep around (12)
Fasten off leaving a long tail for sewing.
Flowers -
Make 8 in various colors of choice.
Round 1: Create a magic circle, complete the following inside: 2 DC, slip stitch (this completes one petal, repeat 4 more times for a total of 5 petals)
Pull the circle tight and slip stitch to the first petal to close, fasten off leaving a long tail for sewing.
Carrot –
Round 1: Create a magic circle with 6 SC
Round 2: SC INC in each stitch around (12)
Round 3: SC in the first stitch, SC INC in the next, rep around (18)
Round 4: SC in the first 2 sts, SC INC in the next, rep around (24)
Round 5: SC in the first 3 sts, SC INC in the next, rep around (30)
Rounds 6-7: SC around (30)
Round 8: SC in the first 8 sts, INV DEC in the next, rep around (27)
Round 9: SC around (27)
Round 10: SC in the first 7 sts, INV DEC in the next, rep around (24)
Round 11: SC around (24)
Round 12: SC in the first 6 sts, INV DEC in the next, rep around (21)
Round 13: SC in the first 5 sts, INV DEC in the next, rep around (18)
Round 14: SC around (18)
Round 15: SC in the first 4 sts, INV DEC in the next, rep around (15)
Round 16: SC around (15)
Round 17: SC in the first 3 sts, INV DEC in the next, rep around (12)
Round 18: SC around (12)
Round 19: SC in the first 2 sts, INV DEC in the next, rep around (9)
Round 20: SC in the first st, INV DEC in the next, rep around (6)
Fasten off and sew remaining part closed, weave in your end.
Leaves -
Make 3
Round 1: Complete the following inside of a magic circle; 2SC, 2HDC, 2DC, 3TR, Ch 1, 3TR, 2DC, 2HDC, 2SC. Pull tight to close and slip stitch to the first SC.
Fasten off leaving a long tail for sewing.
Assembly -
1. Sew the ears onto either side of the head at the 4th - 6th rounds from the top.
2. Next, sew the arms at round 26 (counting from the bottom). Give them a slight forward angle for holding the carrot.
3. Third, attach the legs at rounds 7-14 from the bottom.
4. Sew the leaves onto the top of your carrot. Optional: Sew the carrot to the tips of the arms for a permanent hold.
5. Attach the tail to the center back of your bunny.
6. Lastly, sew your flowers between the ears.
Your Spring Bunny is complete! I hope you have enjoyed making this pattern!
Thank you for stopping by,
Stephanie


Thanks so much for sharing this pattern. Loved working on making this.
ReplyDelete