

Did you know that hippos can sleep underwater? They have a reflex that allows them to surface, take a breath, and sink below without waking up!
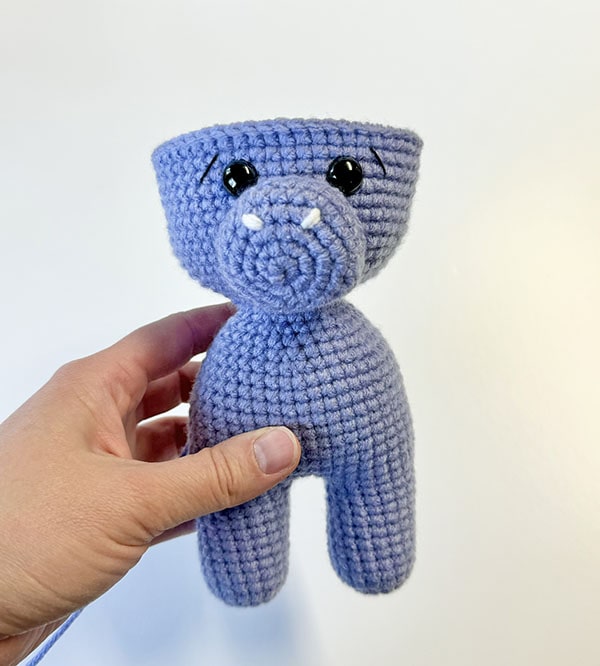
Meet Hudson, our newest amigurumi pattern release in our mini line! He's a great project for some scrap busting as he doesn't require multiple colors of yarn.
Periwinkle is one of my all time favorite shades in the I Love This Yarn collection from Hobby Lobby. It reminds me of spring with the perfect share of lilac and grape. A little hippo was all I could picture when I picked it out!
Hudson has some other friends here on the blog, be sure to check out Leo the Lion, Elsie the Elephant and Zoe the Zebra.
If you're new to amigurumi head over here for some tips and tricks to help along the way.
Don't want to miss a new pattern?
Stay in touch through these platforms below!
Instagram - Facebook - Pinterest - Newsletter - Grace & Yarn Crochet Group - Pattern Directory
Pattern
PIN here to save for later
Grab the ad-free printable PDF in my Etsy or Ravelry shop
(Continue scrolling for the free version here on the blog
You may make and sell items made from this pattern but please do not sell, share or reproduce the actual pattern. If you sell finished items online (Etsy, etc) please provide a link to the pattern and credit to me as the designer, thank you. I hope you enjoy this pattern!
This post may contain affiliate links, please see our disclosure for more information. Thank you so much for supporting Grace & Yarn!
Materials -

Abbreviations - US terminology
MC- Magic circle
SC- Single crochet
HDC – Half double crochet
SC INC- Single crochet increase
HDC INC – Half double crochet increase
INV DEC- Invisible decrease
Rep - Repeat
St(s)- Stitch(es)
NOTES -
- Slowly stuff as you go, you want it to be firm but not stretched. You will be working in the round; I like to use a stitch marker at the beginning of each round.
- Completed mini hippo measures approximately 10 inches tall.
- The legs, body and head will be made as one piece.
- Yarn used is Hobby Lobby’s I Love This Yarn in the shade Periwinkle.
Nose –
Round 1: Create a MC with 6 SC
Round 2: SC INC in each st (12)
Round 3: *SC in the first st, SC INC in the next*, *rep around (18)
Round 4: *SC in the first 2 sts, SC INC in the next*, *rep around (24)
Round 5: *SC in the first 3 sts, SC INC in the next*, *rep around (30)
Round 6: SC around (30)
Round 7: *SC in the first 3 sts, INV DEC in the next*, *rep around (24)
Fasten off leaving a long tail for sewing onto the head. With a small piece of white yarn create nostrils by passing through at round 4, 3 stitches apart.

Legs - Make 2
Round 1: Create a MC with 6 SC
Round 2: SC INC in each st (12)
Round 3: *SC in the first st, SC INC in the next*, *rep around (18)
Rounds 4-12: SC around (18)
Fasten off on the first leg only. When you complete the 2nd leg continue to round 13 to join the legs.
Round 13: Chain 3 and attach to the first leg with a SC. SC in the remaining stitches around the leg. When you reach the chain make a SC across each of the 3 chains. SC in the remaining stitches of the next leg and SC across each of the 3 chains again. You will have crocheted on each side of the chain. (42 SC) This completes your join and is where your next round will start to form the body.

Rounds 14-24: SC around (42)
Round 25: *SC in the first 5 sts, INV DEC in the next*, *rep around (36)
Round 26: *SC in the first 4 sts, INV DEC in the next*, *rep around (30)
Round 27: SC around (30)
Round 28: *SC in the first 3 sts, INV DEC in the next*, *rep around (24)
Round 29: *SC in the first 2 sts, INV DEC in the next*, *rep around (18)
Here is where we will start the head.
Round 30: *SC in the first 2 sts, SC INC in the next*, *rep around (24)
Round 31: *SC in the first 3 sts, SC INC in the next*, *rep around (30)
Round 32: *SC in the first 4 sts, SC INC in the next*, *rep around (36)
Round 33: *SC in the first 5 sts, SC INC in the next*, *rep around (42)
Round 34: *SC in the first 6 sts, SC INC in the next*, *rep around (48)
Round 35: *SC in the first 7 sts, SC INC in the next*, *rep around (54)
Rounds 36-44: SC around (54)
NOTE - Here is where we will attach the facial features. Place the safety eyes 5 stitches apart between rounds 41 and 42. Add eyebrows/eyelashes to your liking before securing the backs of your safety eyes.
Nose - Sew the nose just below the eyes making sure it is centered (stuffing as you go).
Round 45: *SC in the first 7 sts, INV DEC in the next*, *rep around (48)
Round 46: *SC in the first 6 sts, INV DEC in the next*, *rep around (42)
Round 47: *SC in the first 5 sts, INV DEC in the next*, *rep around (36)
Round 48: *SC in the first 4 sts, INV DEC in the next*, *rep around (30)
Round 49: *SC in the first 3 sts, INV DEC in the next*, *rep around (24)
*Continue to stuff the head and neck firmly to avoid a wobbly head*
Round 50: *SC in the first 2 sts, INV DEC in the next*, *rep around (18)
Round 51: *SC in the first st, INV DEC in the next*, *rep around (12)
Round 52: INV DEC around (6)
Fasten off and sew remaining hole closed, weave in your end.
Ears- Make 2
Round 1: Create a MC with 6 HDC
Round 2: HDC INC in each st around (12)
Fasten off leaving a long tail for sewing.

Arms-
Don't want to miss a new pattern?
Stay in touch through these platforms below!
Instagram - Facebook - Pinterest - Newsletter - Grace & Yarn Crochet Group - Pattern Directory
Pattern
PIN here to save for later
Grab the ad-free printable PDF in my Etsy or Ravelry shop
(Continue scrolling for the free version here on the blog
You may make and sell items made from this pattern but please do not sell, share or reproduce the actual pattern. If you sell finished items online (Etsy, etc) please provide a link to the pattern and credit to me as the designer, thank you. I hope you enjoy this pattern!
This post may contain affiliate links, please see our disclosure for more information. Thank you so much for supporting Grace & Yarn!
Materials -
- Size 4 worsted weight yarn (100 yards in purple; small amount of white)
- 3.5 mm crochet hook
- 12mm safety eyes
- Black crochet/embroidery thread for eyelashes/eyebrows
- Scissors
- Tapestry needle
- Stuffing
- Stitch markers

Abbreviations - US terminology
MC- Magic circle
SC- Single crochet
HDC – Half double crochet
SC INC- Single crochet increase
HDC INC – Half double crochet increase
INV DEC- Invisible decrease
Rep - Repeat
St(s)- Stitch(es)
NOTES -
- Slowly stuff as you go, you want it to be firm but not stretched. You will be working in the round; I like to use a stitch marker at the beginning of each round.
- Completed mini hippo measures approximately 10 inches tall.
- The legs, body and head will be made as one piece.
- Yarn used is Hobby Lobby’s I Love This Yarn in the shade Periwinkle.
Nose –
Round 1: Create a MC with 6 SC
Round 2: SC INC in each st (12)
Round 3: *SC in the first st, SC INC in the next*, *rep around (18)
Round 4: *SC in the first 2 sts, SC INC in the next*, *rep around (24)
Round 5: *SC in the first 3 sts, SC INC in the next*, *rep around (30)
Round 6: SC around (30)
Round 7: *SC in the first 3 sts, INV DEC in the next*, *rep around (24)
Fasten off leaving a long tail for sewing onto the head. With a small piece of white yarn create nostrils by passing through at round 4, 3 stitches apart.

Legs - Make 2
Round 1: Create a MC with 6 SC
Round 2: SC INC in each st (12)
Round 3: *SC in the first st, SC INC in the next*, *rep around (18)
Rounds 4-12: SC around (18)
Fasten off on the first leg only. When you complete the 2nd leg continue to round 13 to join the legs.
Round 13: Chain 3 and attach to the first leg with a SC. SC in the remaining stitches around the leg. When you reach the chain make a SC across each of the 3 chains. SC in the remaining stitches of the next leg and SC across each of the 3 chains again. You will have crocheted on each side of the chain. (42 SC) This completes your join and is where your next round will start to form the body.

Rounds 14-24: SC around (42)
Round 25: *SC in the first 5 sts, INV DEC in the next*, *rep around (36)
Round 26: *SC in the first 4 sts, INV DEC in the next*, *rep around (30)
Round 27: SC around (30)
Round 28: *SC in the first 3 sts, INV DEC in the next*, *rep around (24)
Round 29: *SC in the first 2 sts, INV DEC in the next*, *rep around (18)
Here is where we will start the head.
Round 30: *SC in the first 2 sts, SC INC in the next*, *rep around (24)
Round 31: *SC in the first 3 sts, SC INC in the next*, *rep around (30)
Round 32: *SC in the first 4 sts, SC INC in the next*, *rep around (36)
Round 33: *SC in the first 5 sts, SC INC in the next*, *rep around (42)
Round 34: *SC in the first 6 sts, SC INC in the next*, *rep around (48)
Round 35: *SC in the first 7 sts, SC INC in the next*, *rep around (54)
Rounds 36-44: SC around (54)
NOTE - Here is where we will attach the facial features. Place the safety eyes 5 stitches apart between rounds 41 and 42. Add eyebrows/eyelashes to your liking before securing the backs of your safety eyes.
Nose - Sew the nose just below the eyes making sure it is centered (stuffing as you go).

Round 45: *SC in the first 7 sts, INV DEC in the next*, *rep around (48)
Round 46: *SC in the first 6 sts, INV DEC in the next*, *rep around (42)
Round 47: *SC in the first 5 sts, INV DEC in the next*, *rep around (36)
Round 48: *SC in the first 4 sts, INV DEC in the next*, *rep around (30)
Round 49: *SC in the first 3 sts, INV DEC in the next*, *rep around (24)
*Continue to stuff the head and neck firmly to avoid a wobbly head*
Round 50: *SC in the first 2 sts, INV DEC in the next*, *rep around (18)
Round 51: *SC in the first st, INV DEC in the next*, *rep around (12)
Round 52: INV DEC around (6)
Fasten off and sew remaining hole closed, weave in your end.
Ears- Make 2
Round 1: Create a MC with 6 HDC
Round 2: HDC INC in each st around (12)
Fasten off leaving a long tail for sewing.

Arms-
Make 2 stuffing lightly at the bottom
Round 1: Create a MC with 6 SC
Round 2: SC INC in each st around (12)
Round 3: *SC in the first 3 sts, SC INC in the next*, *rep around (15)
Round 4: SC around (15)
Round 5: *SC in the first st, INV DEC in the next*, *rep around (10)
Rounds 6-14: SC around (10)
At the end of round 14 pinch the arm flat and make 5 SC across the top to close, fasten off and leave a long tail to sew onto the body.

Assembly –
- Sew the arms onto the body centered with the head at round 27 (counting from the bottom).
- Next, sew an ear onto each side of the head at rounds 6-7 (counting from the top).

-Lastly, cut 3 strands of purple yarn approximately 8 inches long to make the tail. Using your crochet hook, pull the strands through a center stitch on the back of your hippo and line up each side to be even. Braid strands together and secure with a knot. Trim any excess.

Your mini hippo is complete! I hope you have enjoyed making this pattern. Let me know if you have any questions, I would be happy to help.
Thank you,
Stephanie


great patterns! Carol from Indiana, USA
ReplyDelete