
Ready for something sweet? We are in our first week of Christmas in July 2023 and our first pattern of the month is our new Gingerbread House Plushie!
She's perfect to add to your decor this Winter or as a gift to someone special. And those little heart gumdrops...yep they're my favorite detail!
Each year Amanda of Loops and Love Crochet and I (4 years running!) join together to design 4 patterns to share with you for free on our blogs throughout the month of July. A new pattern is released each week all with gift giving in mind.
You can find more details and our release schedule along with links to previous years' events here!

Don't want to miss a new pattern?
Stay in touch through these platforms below!
Instagram - Facebook - Pinterest - Newsletter - Grace & Yarn Crochet Group
Pattern
PIN here to save for later
Grab the ad-free printable PDF in my Etsy or Ravelry shop
(Continue scrolling for the free version here on the blog
You may make and sell items made from this pattern but please do not sell, share or reproduce the actual pattern. If you sell finished items online (Etsy, etc) please provide a link to the pattern and credit to me as the designer, thank you. I hope you enjoy this pattern!
This post contains affiliate links, please see our disclosure for more information. Thank you so much for supporting Grace & Yarn!
Materials -
- Size 6 super bulky plush yarn (120 yards of brown; small amount green, red, white, pink, and blue)
- 5 mm crochet hook (these are the hooks I use and love!)
- 12mm safety eyes
- Black crochet/embroidery thread for eyelashes/eyebrows
- Scissors
- Tapestry needle (bent tips work wonders for amigurumi)
- Stuffing
- Stitch markers
- Hot glue gun
Abbreviations - US terminology
SC- Single crochet
SC INC- Single crochet increase
HDC – Half double crochet
DC – Double crochet
DEC- Decrease
St(s)- Stitch(es)
Rep – Repeat
Sl st – Slip stitch
Ch – Chain
NOTES -
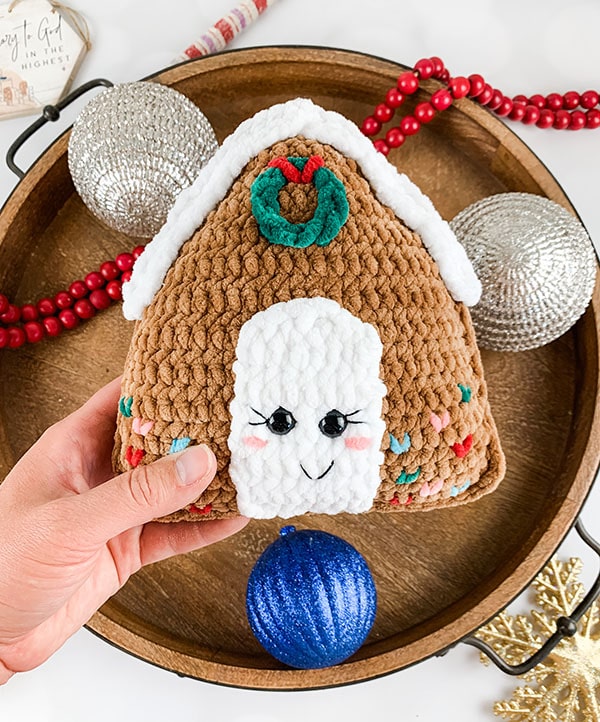
- Finished gingerbread house measures approximately 8 inches tall.
- Yarn used in picture is Premier Parfait Chunky in the shades Teddy Bear, Pink Lemonade, White, Cardinal, Seaside and Emerald.
- Hot glue gun is optional but recommended for attachment of the icing roof to avoid stitching showing through to the other side.

Panel –
With brown make 2
Row 1: Ch 27, SC in the 2nd ch from the hook and in each ch across (26)
Rows 2-16: Ch 1 and turn, SC across (26)
Row 17: DEC, SC into the next 22 sts, DEC (24)
Row 18: DEC, SC into the next 20 sts, DEC (22)
Row 19: DEC, SC into the next 18 sts, DEC (20)
Row 20: DEC, SC into the next 16 sts, DEC (18)
Row 21: DEC, SC into the next 14 sts, DEC (16)
Row 22: DEC, SC into the next 12 sts, DEC (14)
Row 23: DEC, SC into the next 10 sts, DEC (12)
Row 24: DEC, SC into the next 8 sts, DEC (10)
Row 25: DEC, SC into the next 6 sts, DEC (8)
Row 26: DEC, SC into the next 4 sts, DEC (6)
Row 27: DEC, SC into the next 2 sts, DEC (4)
Row 28: DEC, DEC (2)
Row 29: DEC (1)
Fasten off and weave in your ends.

Wreath –
With green ch 12 and sl st to the first ch to form a circle.
Fasten off leaving a long tail for sewing.

Icing Roof –
With white make 2
Ch 19, SC in the 2nd ch from your hook, HDC, DC, HDC, SC, sl st, *SC, HDC, DC, HDC, SC, sl st*, *rep once more.
Fasten off and weave in your ends.

Door –
With white
Row 1: Ch 9, SC in the 2nd ch from the hook and in each ch across (8)
Rows 2-9: Ch 1 and turn, SC across (8)
Rows 10-11: 2SC, HDC, 2DC, HDC, 2SC (8)
Fasten off leaving a long tail for sewing. Place safety eyes between rows 6 and 7 with a stitch in between (do not secure the backs, this will be done below in assembly). With crochet thread add eyelashes/eyebrows and mouth to your liking. Optional: With pink or red yarn add cheeks just below the eyes.

Assembly –
- Working with one of your panels, sew the door centered towards the bottom. Help guide the posts from your safety eyes through the stitches in your panel; secure the backs once they are in place.
- Next, sew the wreath into place two rows above your door. With red yarn and your tapestry needle create a ‘v’ at the top of your wreath to serve as the bow.
- We will use the same ‘v’ technique above to make our ‘gumdrop’ hearts on either side of the door. Feel free to make as many as you like and in the color combinations you prefer.

- Next, place your panels one over the other with your decals on top. With brown yarn create a slip knot and SC into one of the stitches making sure to go through both panels. SC around your entire project with 2SC into the corners. When you are ¾ of the way around stuff firmly. Weave in your end when complete.

- Lastly, using your hot glue gun attach your icing roof onto either side. They will slightly overlap at the top peak.


Thank you this is a cute Gingerbread House
ReplyDelete