
This post may contain affiliate links, please see our disclosure for more information. Thank you so much for supporting Grace & Yarn!
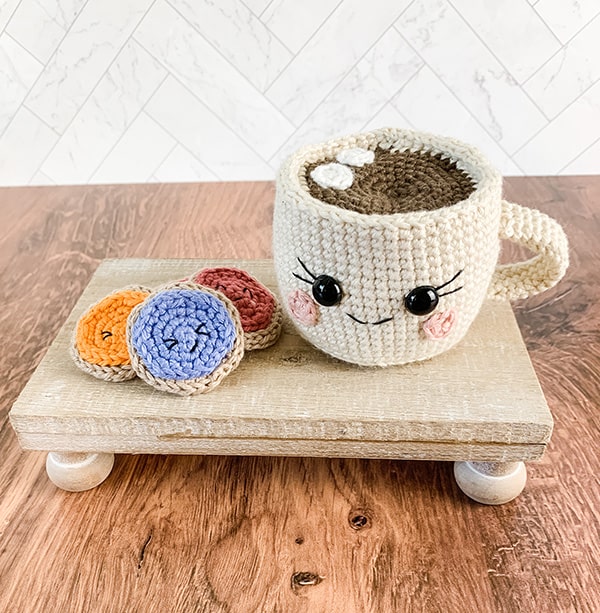
Week 3 of our Christmas in July event is here! I'm so happy to share this sweet amigurumi pattern for Hot Cocoa and Cookies! Thumbprint Cookies to be exact!
They're one of our favorite winter cookies, alongside sugar cookies (which their pattern could totally double for)!
What is Christmas in July?
Each July the sweet Amanda of Loops and Love Crochet and I team up to bring you 4 new fun and free patterns to get a head start on your Winter makes. Whether you're looking for some homemade gifts, items to prepare for a craft fair or to use in your decor we have you covered!
For more details on our event head to this page here! You can also find the links for our first 2 patterns!
If you're new to amigurumi this is a fun project to start out on. There's minimal stuffing and sewing involved! Be sure to also check out these helpful tutorials to walk you through the different methods we'll be using throughout the pattern!
Tips to Amigurumi - All About Stuffing

Don't want to miss a new pattern?
Stay in touch through these platforms below!
Instagram - Facebook - Pinterest - Newsletter - Grace & Yarn Crochet Group
Pattern
PIN here to save for later
Grab the ad-free printable PDF in my Etsy or Ravelry shop
(Continue scrolling for the free version here on the blog
You may make and sell items made from this pattern but please do not sell, share or reproduce the actual pattern. If you sell finished items online (Etsy, etc) please provide a link to the pattern and credit to me as the designer, thank you. I hope you enjoy this pattern!
Materials -
- Size 4 worsted weight yarn (50 yards choice of color for mug; small amount of white, pink, dark brown, beige and choice color for jam)
- 3.5 mm crochet hook (these are the hooks I use and love!)
- 12mm safety eyes
- Black crochet/embroidery thread for eyelashes/smile
- Scissors
- Tapestry needle (bent tips work wonders for amigurumi)
- Stuffing
- Stitch markers
SC- Single crochet
HDC – Half double crochet
SC INC- Single crochet increase
INV DEC- Invisible decrease
BLO – Back loops only
FLO – Front loops only
St(s)- Stitch(es)
Ch – Chain
Rep - Repeat

NOTES -
- Finished hot cocoa measures approximately 3 inches tall; Cookies 1.5 inches.
- You will be working in the round; I like to use a stitch marker at the beginning of each round to mark my place.
- Yarn used in photos is WeCrochet Comfy Worsted in the shades, Ivory, Thicket, White, Flamingo, Parchment, Hydrangea, Peony, and Carrot.
Cheeks –
With pink make 2
Round 1: Create a magic circle with 6 HDC, pull tight to close and secure with a slip stitch to the first HDC
Fasten off leaving a long tail for sewing.
Hot Cocoa Mug -
With color of choice make 1
Round 1: Create a magic circle with 6 SC
Round 2: SC INC in each st (12)
Round 3: SC in the first st, SC INC in the next, rep around (18)
Round 4: SC in the first 2 sts, SC INC in the next, rep around (24)
Round 5: SC in the first 3 sts, SC INC in the next, rep around (30)
Round 6: SC in the first 4 sts, SC INC in the next, rep around (36)
Round 7: SC in the first 5 sts, SC INC in the next, rep around (42)
Round 8: SC in the first 6 sts, SC INC in the next, rep around (48)
Round 9: SC in the first 7 sts, SC INC in the next, rep around (54)
Round 10: SC around in the BLO (54)
Rounds 11-25: SC around (54)
Fasten off and weave in your end.
Facial Features -
Place the safety eyes 4 stitches apart between rounds 18 and 19. Add eyebrows/eyelashes to your liking before securing the backs of your safety eyes.
Smile – With your black embroidery/crochet thread create a smile by making a “V” centered between the eyes. I made mine a row below my eyes.
Cheeks – Sew cheeks just outside of your smile and below each eye.

Marshmallows –
With white make 2 (or more!)
Round 1: Create a magic circle with 6 HDC, pull tight to close and secure with a slip stitch to the first HDC
Fasten off leaving a long tail for sewing.
Hot Cocoa Top –
With brown make 1
Round 1: Create a magic circle with 6 SC
Round 2: SC INC in each st (12)
Round 3: SC in the first st, SC INC in the next, rep around (18)
Round 4: SC in the first 2 sts, SC INC in the next, rep around (24)
Round 5: SC in the first 3 sts, SC INC in the next, rep around (30)
Round 6: SC in the first 4 sts, SC INC in the next, rep around (36)
Round 7: SC in the first 5 sts, SC INC in the next, rep around (42)
Round 8: SC in the first 6 sts, SC INC in the next, rep around (48)
Change to mug color
Round 9: SC in the first 7 sts, SC INC in the next, rep around (54)
Round 10: SC around in the FLO (54)
Fasten off leaving a long tail for sewing. With your tapestry needle sew your marshmallows onto your hot cocoa as desired.

Handle –
With color of mug make 1
Round 1: Ch 8 and sl st to first ch to form a circle (8)
Rounds 2-17: SC around (8)
Fasten off leaving a long tail for sewing. Stuffing is optional, I left mine unstuffed.
Hot Cocoa Assembly -
- Moderately stuff your hot cocoa mug. With your tapestry needle sew your cocoa top onto the mug. Be sure to pass through both stitches on each piece. Finish stuffing just before closing.

- Sew your handle onto your mug. Place the top of the handle 4 rounds down from the top of your mug. Place the bottom of the handle another 8 rounds down.
- Take a piece of brown yarn approximately 6 inches long and pass both ends into your mug from the top (with a stitch in between) and down through the bottom (1). Pull tight to create an indent (2). Knot to secure (3). Weave ends into your mug and trim (4).

Cookie Base –
With beige make 2 per cookie
Round 1: Create a magic circle with 6 SC
Round 2: SC INC in each st (12)
Round 3: SC in the first st, SC INC in the next, rep around (18)
Round 4: SC in the first 2 sts, SC INC in the next, rep around (24)
Round 5: SC in the first 3 sts, SC INC in the next, rep around (30)
Fasten off leaving a long tail for sewing on one of the bases.
Jam Topping –
With color of choice make 1 per cookie
Round 1: Create a magic circle with 6 SC
Round 2: SC INC in each st (12)
Round 3: SC in the first st, SC INC in the next, rep around (18)
Round 4: SC in the first 2 sts, SC INC in the next, rep around (24)
Fasten off leaving a long tail for sewing.
Facial Features (Optional) –
With your tapestry needle and crochet/embroidery thread create the eyes and smile to your liking. Optional – add cheeks.

Cookie Assembly –
1. Place your jam topping on top of one of the cookie bases with the wrong side of the jam facing the right side of the cookie base. Sew into place.
2. Place on top of the remaining cookie base with wrong sides facing each other and sew together. To keep a flat edge around the cookie pass your yarn through the back loop of each piece.

Your hot cocoa and cookies are complete! I hope you have enjoyed making this pattern. Let me know if you have any questions with this pattern or any of my other patterns, I would be happy to help.
Thanks so much for stopping by!


These are so cute! Thanks for the pattern.
ReplyDeleteThank you! Wonderful!!!!
ReplyDeleteThank you, this is so cute! I made this for my little sister and she keeps on calling it coffee. XD
ReplyDeleteJust made this for my one year old niece can't wait for her to see it
ReplyDeleteso cute, thanksssssssssssss
ReplyDelete