

Valentine's Day is almost here, about two weeks away! To be honest though, these bears and koala can be made anytime of the year with or without their little stuffed heart.
These were made with inspiration from the little stuffed animals I remember from when I was little.
The ones that would sit on the shelf holding a heart, some would sing a tune and some were just stuffed cuteness.
When I made the brown bear I also noticed that with slight changes we could have a super cute panda and koala all in one pattern!
The head and body are made as one piece, be sure to stuff the neck firmly and you won't have any problems with a wobbly neck. I've also kept it at a nice width to help support the head.
Feel free to make yours in a boy or girl version. If you'd like to add a bow this one from our Mini Pig should be the perfect size! Could also serve as a bow tie for a boy!
If you're new to amigurumi check out our tips page to get started! The Grace and Yarn Crochet Group on Facebook is also a great place to ask questions, plus share your works of crochet art!
Be sure to also sign up for our newsletter, I'll keep you updated when new patterns and tutorials are posted!
Pattern
PIN to save here!
Get the ad-free printer friendly version in my Etsy or Ravelry shop!
This post contains affiliate links, please click here for more info. Thank you for supporting Grace and Yarn!
You may make and sell items made from this pattern but please do not sell, share or reproduce the actual pattern. If you sell finished items online (Etsy, etc) please provide a link to the pattern and credit to me as the designer, thank you. I hope you enjoy this pattern!

Materials -
- Size 4 worsted weight yarn
- 65 yards color of choice for body
- Small amount of accent color for nose piece
- Small amount color of choice for heart
- 3.5 mm crochet hook (these are the hooks I use and love!)
- 12 mm safety eyes
- 12 mm safety nose (for brown bear and panda)
- Black crochet thread for eyelashes/eyebrows and nose piece
- Scissors
- Tapestry needle (bent tips work wonders for amigurumi)
- Stuffing
- Stitch markers
Abbreviations - US terminology
SC- Single crochet
SC INC- Single crochet increase
INV DEC- Invisible decrease
HDC – Half double crochet
DC – Double crochet
Sl st – Slip stitch
Rep – Repeat
St(s) – Stitch(es)
Notes -
-This pattern includes directions to make a brown bear (or polar bear), panda and koala. Each finished amigurumi measures about 5 inches tall in a sitting position.
- Slowly stuff as you go, you want it to be firm but not stretched. You will be working in the round, I like using a stitch marker at the beginning of each round.
- For this pattern the body and head will be made as one piece.
Nose Piece –
Brown Bear and Panda -
With white
Round 1: Create a magic circle with 6 SC
Round 2: SC INC in each st around (12)
Round 3: *SC in the first st, SC INC in the next*, *rep around (18)
Rounds 4-5: SC around (18)
Fasten off leaving a long tail for sewing. Insert your safety nose centered between rounds 2-3. With crochet thread feel free to add a straight line down from the nose or a mouth/smile to your liking.

Koala -
With dark grey
Round 1: Create a magic circle with 6 SC
Round 2: SC INC in each st around (12)
Round 3: 2 sl st, 2 SC, 4 DC, 2 SC, 2 sl st (12)
Fasten off leaving a long tail for sewing.

Eye Patches for Panda –
With black, make 2
Round 1: Create a magic circle with 6 SC
Round 2: SC INC in each st around (12)
Round 3: 2 sl st, 2 SC, 4 HDC, 2 SC, 2 sl st (12)
Fasten off leaving a long tail for sewing. Place your safety eyes towards the last round as pictured. We will secure the backs of the eyes further in the pattern.

Body-
-The body and head for the brown bear and koala will be the same color throughout. If you are making the panda we will start with white. Instructions on when to change colors will be noted below.
Round 1: Create a magic circle with 6 SC
Round 2: SC INC in each st around (12)
Round 3: *SC in the first st, SC INC in the next*, *rep around (18)
Round 4: *SC in the first 2 sts, SC INC in the next*, *rep around (24)
Round 5: *SC in the first 3 sts, SC INC in the next*, *rep around (30)
Round 6: *SC in the first 4 sts, SC INC in the next*, *rep around (36)
Round 7: *SC in the first 5 sts, SC INC in the next*, *rep around (42)
(For Panda, change to black after round 13)
Rounds 8-15: SC around (42)
Round 16: *SC in the first 5 sts, INV DEC in the next*, *rep around (36)
Round 17: *SC in the first 4 sts, INV DEC in the next*, *rep around (30)
(For Panda, change to white after round 17)
Round 18: *SC in the first 3 sts, INV DEC in the next*, *rep around (24)
Round 19: *SC in the first 2 sts, INV DEC in the next*, *rep around (18)
Round 20: SC around (18)
*We will now start the head*
Round 21: *SC in the first 2 sts, SC INC in the next*, *rep around (24)
Round 22: *SC in the first 3 sts, SC INC in the next*, *rep around (30)
Round 23: *SC in the first 4 sts, SC INC in the next*, *rep around (36)
Round 24: *SC in the first 5 sts, SC INC in the next*, *rep around (42)
Rounds 25-32: SC around (42)
Note: Here is where we will add the facial features before we start closing the head.
Brown Bear – Insert your safety eyes between rounds 29 and 30, 6 sts apart. Feel free to add eyelashes/eyebrows before securing the back of your eyes. Next, sew your nose piece centered between the eyes adding a small amount of stuffing as you go.
Koala – Insert your safety eyes between rounds 29 and 30, 5 sts apart. Feel free to add eyelashes/eyebrows before securing the back of your eyes. Next, sew your nose piece centered between the eyes.
Panda - Place your safety eyes through the eyepatches and then into the designated stitches on the head (between rounds 29 and 30). Between the safety eyes will have 6 sts, between the eye patches will be approximately 4 sts. Sew your eyepatches into place before securing the back of your eyes. Next, sew your nose piece centered between the eyes adding a little bit of stuffing as you go.

Round 33: *SC in the first 5 sts, INV DEC in the next*, *rep around (36)
Round 34: *SC in the first 4 sts, INV DEC in the next*, *rep around (30)
Round 35: *SC in the first 3 sts, INV DEC in the next*, *rep around (24)
*Continue to stuff the head firmly
Round 36: *SC in the first 2 sts, INV DEC in the next*, *rep around (18)
Round 37: *SC in the first st, INV DEC in the next*, *rep around (12)
Round 38: INV DEC around (6)
Fasten off and sew remaining part closed, weave in your end.
Ears- Make 2
Note - Use body color for brown bear and koala; black for panda.
Round 1: Create a magic circle with 6 SC
Round 2: SC INC in each st around (12)
Round 3: *SC in the first st, SC INC in the next*, *rep around (18)
Rounds 4-6: SC around (18)
Arms- Make 2
*Lightly stuff the bottom of the arms only*
Note – Use body color for brown bear and koala; black for panda.
Round 1: Create a magic circle with 6 SC
Round 2: SC INC in each st around (12)
Round 3: *SC in the first 3 sts, SC INC in the next*, *rep around (15)
Rounds 4-5: SC around (15)
Round 6: *SC in the first st, INV DEC*, *rep around (10)
Rounds 7-15: SC around (10)
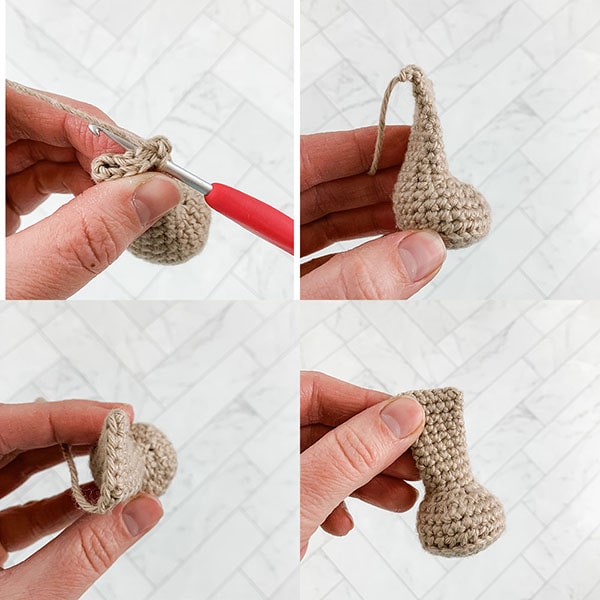
At the end of round 15 pinch the arm flat and make 5 SC across the top to close, fasten off and leave a long tail to sew onto the body.
Legs – Make 2
*Stuff the bottom of the foot only*
Note - Note – Use body color for brown bear and koala; black for panda.
Round 1: Create a magic circle with 6 SC
Round 2: SC INC in each st (12)
Round 3: *SC in the first st, SC INC in the next*, *rep around (18)
Round 4: *SC in the first 2 sts, SC INC in the next*, *rep around (24)
Round 5: SC around in the back loops only (24)
Rounds 6-7: SC around (24)
Round 8: SC in the first 6 sts, INV DEC 6 times, SC in the last 6 sts (18)
Round 9: SC in the first 3 sts, INV DEC 6 times, SC in the last 3 sts (12)
Rounds 10-18: SC around (12)
At the end of round 18 pinch the leg flat and make 6 SC across the top to close, fasten off and leave a long tail to sew onto the body.
Heart –
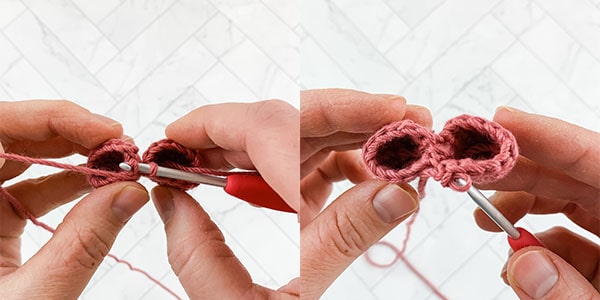
The heart is made with two pieces joined together. Make two pieces using rounds 1-4. At the end of the 2nd piece do not fasten off, proceed to round 5 to join them together and make the body of the heart. Slowly stuff as you go.
Round 1: Create a magic circle with 6 SC
Round 2: SC INC in each st around (12)
Rounds 3-4: SC around (12)
Round 5: Attach to the first piece with a SC. SC around the first piece and then the second (24 SC) This completes your join and is where your next round will start, from here we will work the rest of the heart.
Round 6: *SC in the first 6 sts, INV DEC in the next*, *rep around (21)
Round 7: *SC in the first 5 sts, INV DEC in the next*, *rep around (18)
Round 8: *SC in the first 4 sts, INV DEC in the next*, *rep around (15)
Round 9: *SC in the first 3 sts, INV DEC in the next*, *rep around (12)
Round 10: *SC in the first 2 sts, INV DEC in the next*, *rep around (9)
Round 11: *SC in the first st, INV DEC in the next*, *rep around (6)
Fasten off and sew remaining part closed.
Assembly -
1. Sew the ears onto either side of the head, starting at the 5th round and ending at the 11th round.
2. Next, sew on the arms. I angled my arms slightly forward and they covered rounds 13-17.
3. Sew the legs onto the bottom of the body, making sure to keep them centered with the facial features.
4. Lastly, sew your heart to each hand.

Your sweet Valentine is complete! I hope you enjoyed this pattern, thanks so much for stopping by!


Thank you so very much for your generosity sharing your bear patterns. They are adorable. Especially love your dog with his coat and booties! Too cute!
ReplyDeleteThank you Rosalyn!
DeleteSo cute!! Found you from the HOHD post!
ReplyDeleteThank you so much!
DeleteThank you!
ReplyDeleteThank you..!! Exactly what I was looking for. I LOVE ❤️ all of your DEBRA S.
ReplyDelete